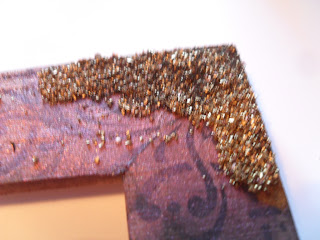
Our new fortnightly challenge starts today over on our Challenge blog HERE. The team have made fantastic projects again, and I've certainly enjoyed playing making this embossed frame.
I bought 3 frames for £1, so a great bargain, and the photo was 50p (a local original from October 1928). I just loved playing with the Stampendous Fran-tage products last September at the Woodware retailer day, I can see me having much more fun with them in future!
The great thing about new things is they can combine your old crafty bits and pieces and I used my old faithful Moonshadow inks to paint the wooden frame
The things I used are:
Moonshadow ink
Stampendous CRS5031-R Cling Jumbo Hollyhock
Stampendous Fran-tage mica and embossing powder mixes
Once dry I stamped with the border stamp in the hollyhock stamp set. I then added more of the ink to one of the corners before adding the Stampendous Fran-tage embossing powders. The ink held the powders in place like an embossing ink normally would on card. Using the ink made it more random than applying the ink from an ink pad.
I added some of the Shabby Chic colours to the metallics. You need to hold your heat gun far away until the powder starts to melt otherwise it flies everywhere. If you have a heat gun with a low setting or one of the hair dryer type guns then they are the best to use.
When using Fran's Fran-tage technique on card you would normally hold the heat gun underneath so that the powder doesn't fly about. This is a slight variation, but still using Fran's encrusted jewel technique.
While the powder was hot I added some mesh ribbon then sprinkled and heated more powder on top to make sure it was embedded. Test and make sure that your mesh is heat resistant before you add it!
I had some left over pieces of metal that are ideal for embedding into the molten embossing powder to add more texture. Keep building up the powder for extra texture
Well, as blogger won't let me add more photos to this post I will continue with it another time, probably when I get back from our show this weekend at the Nissan Sport and Social Club in Sunderland. There's packing and lots to do today to prep for it. The show is open on Sunday from 10am - 3pm. Show details are available here: http://www.rosspapercraftshows.co.uk/
If you are able to attend the show do visit our stand as I will have this frame and other new things to show that I am working on plus other products that I will be demonstrating. We will have some lovely new stamps and things with us plus lots of bargains for you too!
If that's not local, we'll be at the Harrogate show next weekend, maybe we will see you there.
Thanks for visiting, have a great weekend :)
Jill x


fabulous !
ReplyDeleteI LOVE what you have done with this frame Jill, inspiring :) lainey x
ReplyDeleteFantastic frame Jill, look forward to seeing it up close on Saturday.
ReplyDeleteYvonne
please visit my blog as I have nominated you for an award :) lainey x
ReplyDeleteThis looks just amazing Jill, I just love the textures and colours on this one. Thanks for showing the steps.
ReplyDeletehugs {brenda} xox