Saturday, 3 April 2010

Time Workshop/Tutorial Part 5 - More images/words to add plus here's the finished card!!


Ok, here's the card at last!   Yes it's an easel card, surprise surprise!!

There are more elements/details to show but I think I've teased enough so thought I would show the card now.   The photo below is when it is closed. 


As I say, I will be explaining more things and also about making up the card in another post but for now there's some more elements to prepare...


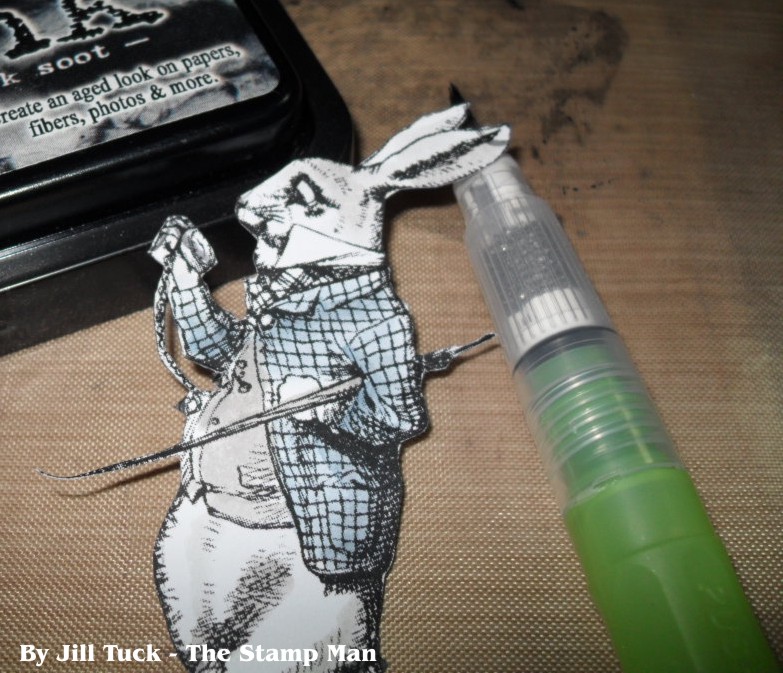
I need to thank Elizabeth Golden for the white rabbit image which is from one of her Alice collage sheets.  Visit Elizabeth's blog The last door... down the hall, she has an amazing blog!!  The link will take you directly to the post with the sheets but I think you will want to have a good look around as there are various interesting things to read including some recipes.


Print off the image onto thin card (thin card is easier to cut out). 

I painted the image with the Distress Inks.  Transfer ink from the pad onto a non-porous surface, a craft sheet, old plate, or tile.  Then use a brush and water or waterbrush to paint the image before cutting out.  If you have a black or dark coloured pen, go around the edges of the cut out piece.  This gives a better finish as it hides the white edge of the cut.

Stamp out the wings from the winged heart stamp from Tracey's stamp sheet AOD62 Artistic Flourishes, paint and cut out.

The wording was printed from my computer, cut out then edged with the Stormy Sky Distress Ink. 

To attach the wings, I used silicone as there is only a small area which is fixed and it will give a stronger hold.


That's all for this stage, I hope you like the finished card!  I think it fits in well with the Alice/Steampunk theme that is current at the moment.

I'll be back with more details about the card, I hope you're still with me, I can assure you it is taking longer to explain than it took to make!

Jill

Time Workshop/Tutorial Part 4 - Distressing and preparing card pieces


Time for some distressing!
Materials
Aspects of Design 62 Artistic Elements unmounted stamp sheet by Tracey Coates
Hero Arts cling stamp CG186 Big Clock
Hero Arts  cling stamp CG144 Time to Stamp
Distress Ink Stormy Sky and Pumice Stone (we've got these on special offer on the website!)
Tim Holtz Foam Applicator or Cut 'n Dry Foam
Tim Holtz Game Spinners
Black permanent ink pad suitable for shrink plastic or Black Stazon
Non stick heat resistant craft mat or Woodware Hot Stuff Mat

I used a Tim Holtz applicator and foam to apply the stormy sky and pumice stone Distress Inks to the card panels.  You've all probably seen this done by now. 

Basically you apply the ink to a non porous surface, I use my non stick heat resistant craft mat for this.  This is the tan mat I have been working on so far.  I've used these mats for years and can truly say every messy crafter NEEDS one as a core piece of equipment!!

You place the ink pad face down on the mat, to transfer a square of ink onto the mat.  Ink the foam with some of the ink then starting off the card gradually come onto the card applying in a circular motion.  This way of applying helps avoid lines of ink and creates a smoother blend. 

As you repeat this the corners and edges will have a deeper shade as you go over this a number of times as you work the colour into the centre of the card.  This give a lovely finish to the corners and edges.

So, I would recommend cutting the card to roughly the correct size before inking rather than cutting up a large piece later as you will have nice corners and edges on each piece.

Now, the subject of which card to use, I will perhaps cause controversy by saying I've only used cheaper copier card on the pieces of this project.  One reason is because there are so many elements on it I wanted to keep the card weight down but mainly as I get a nice blend on it.  As you can see below there are not too many lines and it has blended quite well.

I believe the mistake some people make is that when you first apply them you will get some lines and I've found that the more you do the more primed the foam pads become.

I keep one pad per colourway.  They can be carefully washed/rinsed through if needed.

The other thing I think people struggle with is that they don't give the inks time to blend on the card.  Yes, it often doesn't look perfect straight away but leave it to one side and you will see a difference after time.

By applying a paler colour and building it up you will have more ink available to blend than say trying to use a dark colour sparingly.

Take time to do the blending and work at it.

Other people may not agree with the above but I am just writing about how I find it.  If you are happy with the way you do it yourself, then that is the right way for you too.

Next cut the panels and ink them

Once these are cut apply the inks to all the pieces listed below marked in bold. The instructions not in bold are what the panels are for.

The panel sizes you will need are:

2 x pieces of white card 4" square (or 10 cms), one piece of black card slightly larger for mounting one of the pieces. 


Stamp the Big Clock on one of the pieces and cut out.  Make a hole in the centre ready for the larger game spinners/clock hands.  (Instructions for the centre cog below)


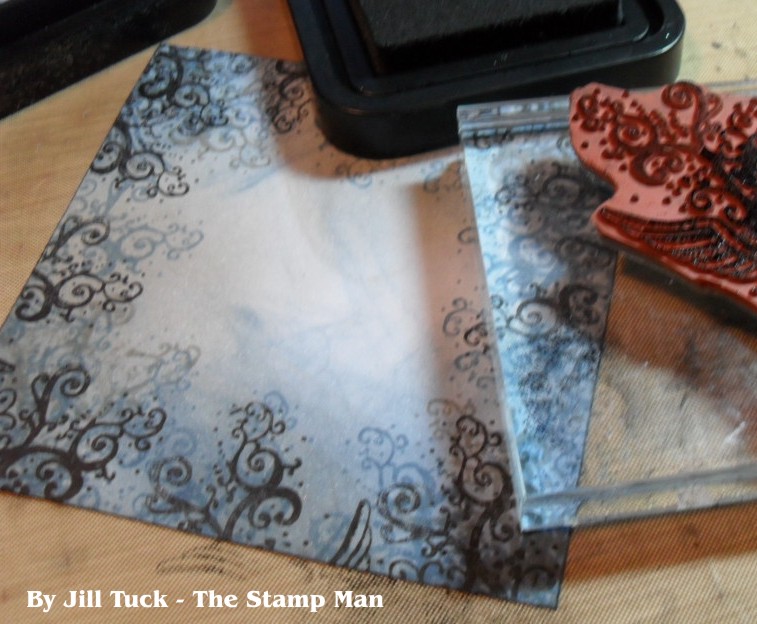
On the other piece ink just the swirls on the winged heart stamp (from AOD62) in Stormy Sky ink and stamp all aound the outside, then again all the way round with black ink.  I have left the centre as the clock will be mounted over this.

White card 4 1/2" (12 cms)  x  5 3/4" (15cms), this piece will be stamped and trimed slightly later along with black card slightly larger for mounting

Stamp the Time to Stamp large background stamp onto this with black ink.

A long white strip 8"  (20cms) x 1 1/4" (3cms) below.  Stamp the Time to Stamp clock background stamp twice to fill the strip you can see under the cogs.  This is a little sneak preview of the back of the card, which is also the top of the card when closed!


An 8" (20cms x 4" 12cms) panel.  This will need a slight trim to fit the base card as below.


An A5 piece of card to cut more cogs, you should be able to get all 3 sizes plus an extra cog or 2 cut from the rest of the sheet.   Once cut out apply the colour to the cogs to create shading around the teeth and outside of the cogs as shown in the first picture above with the large clock.

I think that is enough confusion for now!!  If you fancy trying this card then I'm sure it will all make sense as you work through the different stages.  There will be more about the other images on the card in the next post.

I'll also be showing the finished card, hurray...at last you say... about time you saw where all this is leading!!

Friday, 2 April 2010

Time Workshop/Tutorial Part 3 - Shrink Plastic Clock with Glossy Accents


If you missed them, the instructions for the basic clock are on the previous post.  Before adding the clock hands for this one I covered the top with Glossy Accents.

Extra Materials
Glossy Accents
There are other variation you could use instead of Glossy Accents, ie. Crackle Accents, Matte Accents and Sepia Accents.  They can all be found on the same link.  There is a new one that will be available soon, Enamel Accents. 


Do not shake the bottle before using as it will create air bubbles!

The Glossy Accents is milky when first applied but will dry clear with a high raised gloss finish.  Avoid applying near the centre hole.


Apply the glossy accents using the nozzle to guide it where you want it to go.

Make sure you go around the edges for a nice finish.  At this stage ensure there are no air bubbles, any you find can usually be dispersed with the nozzle or a pin.


See, I did warn you that I would be saying don't do it this way at some point!  If you look to the left on the middle of the clock below you will see lots of tiny bubbles.  I applied this at night just before I went to bed so that it would be dry by the morning but I didn't check for bubbles.  You can get air bubbles even if you dont shake the bottle.  As I mentioned in the previous paragraph, if you have any just prod them with the nozzle of the bottle or a pin while it is still liquid and it should remove most of them.

Another tip is to leave the bottle upside down for a while before using it.  This way any air at the top of the bottle will travel up to the bottom! 

Place a cocktail stick in the hole if you have one, this will help stop the glossy accents from filling it.  Glossy accents is quite thick and it will usually stay where you put it, so it shouldn't fill the hole. 

It will self level during the drying time if you have any lumps or bumps.


Finish the edges off with a permanent black ink pad such as Stazon.  This next photo is a bit dark but I think you can see the different between the two I made from the shrink plastic.


Part 4 coming tomorrow! 

Jill


Time Workshop/Tutorial Part 2 - Shrink Plastic Clocks


The next elements for the card are the shrink plastic clocks.  I love these as they are so cute and the hands go round and they just feel and look nice:)

Now this is a long post, it gets more interesting today, so I think you will want to put the kettle on before you start reading!

Materials
Hero Arts cling stamp CG186 Big Clock
Frosted Shrink Plastic
Sanding Block
Distress Ink Stormy Sky (this is a fantastic shade!) and Pumice Stone (we've got these on special offer on the website)
Tim Holtz Foam Applicator or Cut 'n Dry Foam
Tim Holtz Game Spinners
Black permanent ink pad suitable for shrink plastic or Black Stazon


Sand the frosted shrink plastic to give it a key for the ink.  If you sand it you can then use an ink that isn't permanent to tint the plastic.

To do this start with the block at the centre of the piece and rub towards the top of the shrink plastic so that the block goes right of the sheet.  Sand until you have a matt finish.  Turn the piece 180 degrees and repeat until your sanding completely covers the piece in downward stripes. 

Now turn it 90 degrees and again starting from the middle sand off the side.  Turn 180 degrees then sand again to complete the cross hatched sanding.  You will achieve a nice even sanding all over.

Brush away the dust.  Then take the Stormy Sky Distress Ink Pads and add colour direct to plastic from the ink pad.

When it is completely covered, wipe away most of the ink with kitchen towel.  You will see a faint tint of the ink remaining.  As the colour will intensify when shrunk you want it quite pale.


Add a small amount of the Distress Ink Pumice Stone randomly wiping off any excess so that it remains pale.

Stamp the Hero Arts Big Clock stamp with a permanent ink.  Stazon ink will dry quickly, but others may remain wet and you will have to be careful cutting out the image.

I found that the clock is about the same size as the largest circle of the nesties, so if you hate cutting out circles you and use this through your die cutting machine. 

If the edges are rough or uneven you can sand them with the block to smooth them out but shrink plastic is very forgiving when shrunk.

Incidentally, I didn't mention yesterday but I used Tim's Gadget Gears Sizzix die through my Cuttlebug, you only need to use the 2 B plates.


You need to make a hole on the centre before you shrink.  The punch, or eyelet setter tool needs to be 1/4" (about the same size as an office hole punch) as the hole will obviously shrink too.

Now the fun bit, heat with your heat gun.  Try not to panic about it sticking to itself, generally if you leave it alone it will sort itself out. 

Just a tip here, shrink plastic doesn't stick to wood so if you don't have a non-stick craft sheet you could use a wooden chopping board.  Also, being metal, tweezers can get hot, I prefer to use a lolly stick or wooden dowling to hold the plastic in place while heating (it does have a tendancy to fly away!).


When the piece has completely shrunk, splat it with an acrylic block or something simliar.


This photo shows the difference in size after shrinking.  The clock is just over 3 1/4" or 9cm full size and 1 1/2" or 4 cms when shrunk.


I added the game spinners but felt the piece needed a little more tidying.  I pressed the edges around the Stazon ink pad.


Now as I was playing I wasn't just going to make that second one the same was I?  Of course not! So the next post is an another idea to try.

Jill

Thursday, 1 April 2010

Time Workshop/Tutorial Part 1 - Shrink Plastic Cogs/Gears


I'm going to work through all the individual elements for the card first.  As I said in my intro post, there are lots of different elements/techniques to get through.  There will be wrong bits, flaws, confessions and some don't do this' along the way, I'm just warning you now not to expect total perfection! 

The card is actually for Ian, The Stamp Man's birthday, of course he's already seen it but there you go.  It's an apt theme for me as I'm alway late, especially with cards for the family (yes Mum!!).  For once this one is early, I may just give it to him late so he won't have any surprises!

Anyway, the photo above shows a selection of just some cogs/gears I made for the card (there's more on cogs/gears another time though).  I have used Tim's new Gears Alteration Sissix die to make  them.  Some that are shown here are made from card and some with shrink plastic.  I'll talk about the card ones another time.

The cogs/gears are quite large, so as well as using them as they are, they are perfect for using  with shrink plastic.

Materials
White, frosted and black Shrink Plastic
Sanding block
Brilliance ink - Starlight Silver
Tim Holtz Gadget Gears

I thought I'd make a start on a fun bit first, I LOVE shrink plastic!  Firstly, I'll mention sizes, (which are approximate), the frosted piece is the smallest cog unshrunk 4cms or 1 1/2", the black has been shrunk and is 1.5cms or 1/2".  I haven't coloured or messed with these at all, I wanted them raw so they are just cut out and shrunk.


The next 2 are the large size, the frosted one is unshrunk and is approx.  3" or 8cms, the shrunk piece is 1 1/4" or 3cms


The medium size is 2 1/4" or 6cms unshrunk or 1 1/4" or 3mm. When shrunk 3/4" or  2cms

I gave the black shrink plastic a light sanding then covered it completely with ink from a Brilliance Starlight Silver ink pad (picture above). 

Brilliance ink becomes permanent when heated so is an ideal ink to use on shrink plastic.  It is a pearlescent ink and gives a lovely galvanised metal effect, especially on the frosted shrink plastic (picture below).


I left some pieces just as they are


These are the completed pieces. I'll be explaining more about shrink plastic in the next post.

Thanks for reading.

I hope you have a Happy Easter weekend!

Jill

Time Workshop/Tutorial for the weekend - Intro


I've decided to do a workshop/tutorial thingie with all the stuff in this photo.  As you know I am a tease so why change?  I'm sure that you can see the theme though, so I'm not being too cruel!!

I'll be showing the finished card along with all the step by step stages over the weekend, so please call back and see it all develop.

I've taken about 40 photos, there'll be bits you already know about but maybe some of you will pick up some tips or ideas along the way.

I haven't written any words yet but I will post them as I get it done over the next few days.  There will be quite a number of parts to it as I've used lots of techniques for the elements on the card.

I've been itching to get on with this card for ages and I'm pleased I've finally got it done.  I've been working on it in the evenings this week so I hope the photos I've taken will be OK, oh and you'll have to excuse my very distressed craft mat, it is a disgrace!!

Will probably be back later with Part 1.

Jill