

Time for some distressing!
MaterialsAspects of Design 62 Artistic Elements unmounted stamp sheet by Tracey Coates
Hero Arts cling stamp CG186 Big Clock
Hero Arts cling stamp CG144 Time to Stamp
Distress Ink Stormy Sky and Pumice Stone (we've got these on special offer on the website!)
Tim Holtz Foam Applicator or Cut 'n Dry Foam
Tim Holtz Game Spinners
Black permanent ink pad suitable for shrink plastic or Black Stazon
Non stick heat resistant craft mat or Woodware Hot Stuff Mat
I used a Tim Holtz applicator and foam to apply the stormy sky and pumice stone Distress Inks to the card panels. You've all probably seen this done by now.
Basically you apply the ink to a non porous surface, I use my non stick heat resistant craft mat for this. This is the tan mat I have been working on so far. I've used these mats for years and can truly say every messy crafter NEEDS one as a core piece of equipment!!
You place the ink pad face down on the mat, to transfer a square of ink onto the mat. Ink the foam with some of the ink then starting off the card gradually come onto the card applying in a circular motion. This way of applying helps avoid lines of ink and creates a smoother blend.
As you repeat this the corners and edges will have a deeper shade as you go over this a number of times as you work the colour into the centre of the card. This give a lovely finish to the corners and edges.
So, I would recommend cutting the card to roughly the correct size before inking rather than cutting up a large piece later as you will have nice corners and edges on each piece.
Now, the subject of which card to use, I will perhaps cause controversy by saying I've only used cheaper copier card on the pieces of this project. One reason is because there are so many elements on it I wanted to keep the card weight down but mainly as I get a nice blend on it. As you can see below there are not too many lines and it has blended quite well.
I believe the mistake some people make is that when you first apply them you will get some lines and I've found that the more you do the more primed the foam pads become.
I keep one pad per colourway. They can be carefully washed/rinsed through if needed.
The other thing I think people struggle with is that they don't give the inks time to blend on the card. Yes, it often doesn't look perfect straight away but leave it to one side and you will see a difference after time.
By applying a paler colour and building it up you will have more ink available to blend than say trying to use a dark colour sparingly.
Take time to do the blending and work at it.
Other people may not agree with the above but I am just writing about how I find it. If you are happy with the way you do it yourself, then that is the right way for you too.

Next cut the panels and ink them
Once these are cut apply the inks to all the pieces listed below marked in bold. The instructions not in bold are what the panels are for.
The panel sizes you will need are:
2 x pieces of white card 4" square (or 10 cms), one piece of black card slightly larger for mounting one of the pieces.

Stamp the Big Clock on one of the pieces and cut out. Make a hole in the centre ready for the larger game spinners/clock hands. (Instructions for the centre cog below)
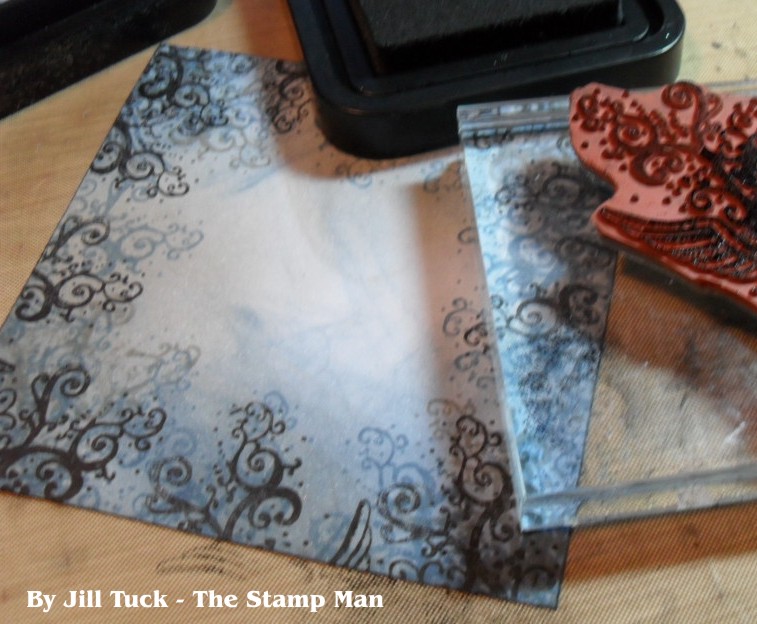
On the other piece ink just the swirls on the winged heart stamp (from AOD62) in Stormy Sky ink and stamp all aound the outside, then again all the way round with black ink. I have left the centre as the clock will be mounted over this.
White card 4 1/2" (12 cms) x 5 3/4" (15cms), this piece will be stamped and trimed slightly later along with black card slightly larger for mounting
Stamp the Time to Stamp large background stamp onto this with black ink.

A long white strip 8" (20cms) x 1 1/4" (3cms) below. Stamp the Time to Stamp clock background stamp twice to fill the strip you can see under the cogs. This is a little sneak preview of the back of the card, which is also the top of the card when closed!

An 8" (20cms x 4" 12cms) panel. This will need a slight trim to fit the base card as below.

An A5 piece of card to cut more cogs, you should be able to get all 3 sizes plus an extra cog or 2 cut from the rest of the sheet. Once cut out apply the colour to the cogs to create shading around the teeth and outside of the cogs as shown in the first picture above with the large clock.
I think that is enough confusion for now!! If you fancy trying this card then I'm sure it will all make sense as you work through the different stages. There will be more about the other images on the card in the next post.
I'll also be showing the finished card, hurray...at last you say... about time you saw where all this is leading!!
No comments:
Post a Comment
Your comments are always really appreciated!