Showing posts with label Cling Film Technique. Show all posts

Sunday, 17 January 2010

Nautical boxed card from Saturday's show


The light is not brilliant for taking photos today, but here is one of the cards/boxes that featured in the show.


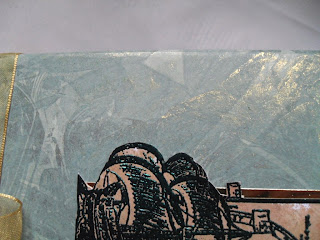
I used the Gator Gumbo Olive from the Mardi Gras set with the cling film technique on the top of the box and sprayed the bottom half of the box.


You can see how the box folds inside, I initially thought all they all folded under into themselves but this is a much better way of making them.  It really is worth following the instructions for the first box, then they are easy peasy every time.  You don't need to use glue or cut anything, just fold them.

The next couple of pictures show the pattern of the cling film technique. 


I used Moonglow Midnight Teal Obsidian embossing powder to emboss all the designs.


I wanted to put a gold embellishment, such as a ship or anchor charm on the bottom LHS of the card, but could I find one?  No... I will have to find one before I can finish the card properly.  I like to use buttons and have some somewhere with an anchor, they will turn up eventually I'm sure.


I used the dry paper stipple on the background before stamping the script randomly with brown Stazon.  I folded the edges around a paintbrush to make a scroll for the wording.


One of the demos I was going to show was a finishing touch to the box lid.  I opened up the box lid and fixed the ribbon ends inside so they were hidden to give a neat finish on the inside of the box lid.
 
I used a plastic button for the centre of the bow, I used wire cutters to remove the shank and fixed it into place with silicone glue.

Monday, 7 December 2009

Blog hopping and other stuff


Thank you to everyone who hopped by yesterday to take part in the Tuesday Tagger's Blog Hop.  If you didn't join in yesterday, you still can, as it runs through today too, and you still have a great chance of winning some nice prizes!  Scroll down or click on yesterday's post to get all the details about it, where to start etc.  It was a great fun yesterday, so well worth you joining in with it today.  Thank you to all the Tuesday Tagger admin team for organising it, count us in if you want to do it again:)

Today's card is another from last Saturday's Create and Craft TV show.  A whopper, 8" x 8" card. 

It's featuring my all time yummy favourite Moonshadow Inks!  The colours are great and the fact that the mica and walnut ink separate so well never fails to wow me.  I just love them so much.  I used Craft Creations linen white card for this, the Moonshadow Inks LOVE their textured cards!  Their card is great quality, a fab weight and thickness to it, which makes a better quality card.  When you think of the time you spend making a card, spending a little more on good quality card is SO sensible, it really makes a difference. 


Craft Creations also provide a service to cut card to size for you.  I've been using their service for this for well over 20 years now, even before Ian and I got together and started The Stamp Man.   

Sorry, digressing...  

When I received my first jars of Moonshadow Ink to try, I was very nervous about using them, I hadn't a clue what to do with them apart from the instructions about adding hot water to the fill line!  I spoke to Lindy who developed them and she suggested I give a piece of card a wash of the ink and then add some salt....  Ummm....


Well, I gave it a try and have been totally hooked ever since!

On last Saturday's show, Nigel waggled the card around so you could see the difference when you move the card, he really showed the brown look from the walnut ink and the stunning green shimmer from the mica.  Good lad!! 

When you add salt to the inks, well, special stuff happens, the salt draws up the ink, as in silk painting, leaving lovely flower like patterns as in this example of rock/course salt


Here's the same idea with Buccaner Bay Blue, oh, so, fab, wish you could really see this one!


And, aged pitted vintage style patterns with normal table salt.


OH, ....Love it, love it, love it!  Lots of yummy mica in these jars!!

I also painted the bling maiden's hair with the same Moonshadow Inks. 


You cannot see in this photo but her hair really shimmers too!


Oh, I had to share this piece too, Violaceous Violet Moonshadow Ink with the cling film technique same idea as yesterday's post, but with Moonshadow Inks!

All yummy, yum, yum, yumminess!!

I started making my Christmas cards yesterday, 'twas quite a frenzy!  Lots of elements made for them so far, but no actual finished cards just yet, although 4 almost sort of done:)  I had better get a move on with them...

Thanks for stopping by, and for leaving all your comments. 

Jill

Sunday, 6 December 2009

Tuesday Taggers Blog Hop here today & tomorrow!


Good morning and welcome to all the Tuesday Tagger blog hoppers!

I mentioned in yesterday's post about the prizes we are sponsoring, so scroll down if you missed that info yesterday.  Basically Tracey, Debbie and I are each sponsoring one of Tracey's recent unmounted stamp sheets each.  My sheet is the Classical Instruments from which the above card has been made.  I'll give more details about it after the blog hop info.


If you would like to join in the Blog Hop, then you will need to go to the Tuesday Taggers Blog which is your starting point.  You will find the instructions there.

For those that have already started, well done on getting this far.   I'm going to hop along too just for the fun of it and I'm sure I will be tagging along at the end as I'm sure to get sidetracked reading everyone's blogs along the way!

Just to check you are hopping in the right direction, you should have arrived here from Avril's Blog, if you have missed any of the hops you may want to go back to the beginning and check through from the Tuesday Taggers blog which is the starting point.

The letter you need from me is an O!  Don't forget to leave a comment for a chance to win a prize!

Your next visit should now be to Janet's Blog.

Thank you for joining in and I hope you have enjoyed your journey so far!

*  *  *  *  *  *
OK, back to the card...

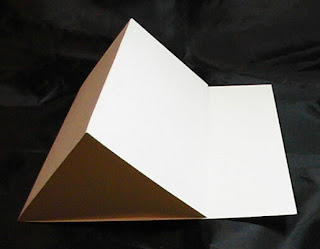
The next couple of pictures shown the fold for the easel card, it is so simple to do.  You can use any shape or size card, I've used a 4" square card (that was already folded in half).  Now fold the front of the card in half so that the mountain fold is at the front.


This is how the fold should be made. 


You will need to cut a separate piece of card that is the same size as the folded card, I used a 4" square piece cut from a sheet of Starburst Stain/cling film technique.


Here's the same technique but in a different colour.  Both are from the French Country set.  Amaryllis Burgundy and Jack in the Pulpit Teal.


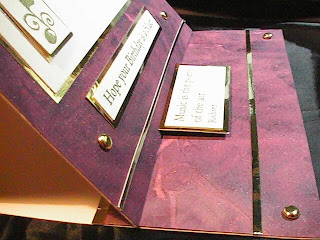
You can decorate as much of the card as you like, I did the back top panel and half of the bottom base with the same stain card but left the inside triangle part blank. 

I embossed the trumpet and all the wording with gold embossing powder.  I then layered them onto gold mirri card. 

I added double-sided tape to the back of mirri card then cut thin strips for borders (they aren't peel offs), so it would all match, I also added gold brads.  Here is a side view of the finished card.


I used wording on the bottom piece, lifted with foam pads, to hold the front panel in place.


To close the card to put in an envelope, lift the front panel and it will lay down to form the original 4" square card.

Thanks for visiting,

Jill