Showing posts with label Moonglow Embossing Powder. Show all posts

Saturday, 28 January 2012

Embossing, Embossing and more Embossing!!!


We're almost ready to set off and set up for our next show, the 3rd show in 3 weeks!!

SUNDAY JANUARY 29TH 2012
Leeds Grammar School, Leeds, LS17 8GS (10am-3pm)
More Info: http://www.rosspapercraftshows.co.uk/

As you may have gathered from the post title I'm demonstrating embossing.  We have some amazing show offers and the best are on embossing powders, many varieties including Moonglow, pastel shades and of course your basic detail powders.

I love embossing these hearts and they are great embellishments for Valentine's Day


I will also have some previous work I have made with embossing powders so you can see them in real life, remember these?


Plus the filigrees....


So that's what I'm playing with on Sunday, hope you can visit the show.

All these embellishments lead me on to mention that our new challenge started yesterday and theme is Embellish It, so hope you can join in, I'll be jumping in late adding something onto the DT work that is already on show there.  The link to our challenge blog is in the sidebar.

Have a great weekend whatever you are doing!

Jill x

PS:  If I get them finished tonight, I'll be back later to tell you about something else we will have at the show!!  

Friday, 8 April 2011

New Challenge - Embossing!


The last 2 weeks have flown by and here we are again at the start of a new Stamp Man challenge.

This time the theme is embossing, of any kind you fancy using, with any technique.  Use embossing powders, or even embossing stencils and paste, your choice.

We have a new Design Team Member, Neil of Neelz Expressionz, who is our host for the next fortnight, so please do visit our challenge blog to read all about it


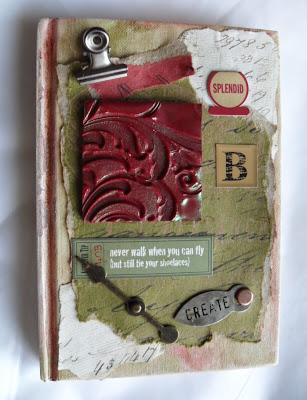
My project started off as a plain looking address/birthday book, if you flip it over, the cover is for the address part, so I had 2 covers to alter.  

I wanted each cover to be a little different to make it easier to open it on the right side.  

I gathered some bits together to use, I've been itching to play with Tim's new distress stains, so picked the nearest colours that are available to match the embossed piece I wanted to use.


Here's the list of things I used: 
7 Gypsy stickers - sale room in shop.


I used Moonglow 2 tone embossing powder in poinsettia red/green onto 2 pieces of thick Magenta 2" square chipboard.  You can see how thick it is in the photo below and when I say red/green ep, I mean the red and the green in the same jar!  (When you tilt the finished piece you can see red, green or both colours).

I added a few layers of the magic powder before stamping into it with Hero Arts S5449 Fabulous Flourish.


I love this poinsettia red/green powder!! 


I also loved the texture of the original book cover so I didn't want to cover it all in paper.  


I painted it with gesso as the cover was coated and I also wanted to start with a blank canvas.

Once it was dry I got down to playing with the stains and other bits and pieces.  The next 2 photos show the embossing on Tim's new Kraft Resist paper, I used the stains and the embossing that is already on the papers just pops through, so there is more embossing that the main UTEE piece.  It wasn't easy to photograph but you can just see it.


This photo shows it a little better, the writing is resisting!  There is also some script, in black, that comes pre-printed on there too.  It's just one of the papers in the pad.  The sheets are quite thick, so excellent quality,  and I can see it is going to be a joy to use in future.


Here are the finished covers.  I used some 7 Gypsy stickers, along with a B alphabet sticker, so I know it's the birthday side.  I'm terrible about having things to fiddle with, especially on the phone and as I usually have it nearby I had to have some moving parts on there.  I can open and close the hinge clip, spin the game spinner and swivel the photo tab (the photo tab is from the same range as is in the Blog Candy prize).

I also added some pieces of a page from an antique account book that I have been stroking for FAR TOO LONG... too long for my own good (I must have been treasuring it for at least 15 years!).... So, I've now used a few pieces of it and I can still stroke and enjoy it :D


I added one of Tim's new pen nibs to the address cover, I will probably regret it when I keep catching myself on it, but hey ho, it HAD to be included!

The colours aren't showing too well in the photos but I think you can see enough.

I hope you will join us in our new challenge.

*  *  *  *  *

I've had a bit of a move around on our website this week, I've added some new things too, plus I'm trying to get more of what we do stock in the shop on there.  I hope you will be able to find things OK, it's my intention to make things easier to find, especially all the Tim stuff as there is so much of it now!  We'll see how this way works.  Basically I've put Tim and all the other Ranger designers into a Ranger section, it might take a bit of getting used to!!

Jill

Thursday, 2 December 2010

Starburst stains and Moonglow EP's


A couple of cards today, one for Christmas and one 'normal' one (I thought a non-Christmas card would be a break at the moment). 

I made these cards a while ago along with another that you have already seen that were all made using the same background paper I made with the Starburst Stain scrunch technique that was sprayed with black webbing spray.

I have used Magenta tiles with Moonglow embossing powders and Hero Arts Fabulous Flourish to create the tiles on the card above.

The embossed embellishment on the card below was again made with Moonglow Embossing Powders and stamped with the Hero Arts Big Flower stamp, it has a very useful star in the centre along with the rays, have a look at the stamp and you will see what I mean.

Apologies for the photo's looking wonky, I took the photos standing on a step ladder in the shop as they are now on display boards.


I'm looking at all the snowflakes on the card above in a different light, I don't want to see any more snowflakes now until Christmas Day!!!

Keep safe and warm

Jill

Friday, 5 November 2010

New challenge - Christmas - Anything Goes


 I used the following products to make this card


Tim Holtz stamps, Santa's Wish

Starburst Stains Holiday Wreath set

Distress Inks On the main image

Moonglow Embossing Powder Holly Berry Red Gold  to make the 2-tone red/gold heart embellishment, which was then stamped with Aspect of Design 62 Artistic Elements  with heart wings stamp

Nestie: Classic Scalloped Heart I cut the heart embellishment with thick card, the thickest I could cut with my nestie

Nailheads


White Webbing Spray over the Starburst Stain background, (this is only available at the shop as we cannot post the aerosol spray).


The picture below shows the embellishment that I've built up with about 2-3 layers of of the embossing powder.  When using more than one layer of Moonglow EP you really get to see the 2-tone effects.


 Finally a picture of the white webbing spray, it really stands out from darker backgrounds


If you wish to join our challenge, please click here, don't be shy, we'd love you to share your work with us:)

Jill

Friday, 22 October 2010

Stamp Magic Show, The Dome, Doncaster


Are you planning to come to the show on Sunday?  If so, you'll see these and others I have made this week in real life!

I will be demonstrating the technique Vix showed at the Port Sunlight show and also our demo weekend last week.  It is transfering images/printed papers onto sticky back canvas.  I'll also be showing how to make embossed embellishments with Moonglow 2-tone embossing powders.  They really are magic!!!

I've also made another batch of Moonglow embossing powder sample pieces, ATC size, to give away, so that you can remember it when you get home.

The image below was transfered onto canvas from a lazer printed image.  It has a distressed aged feel to it so of course it had to have my favourite Moonshadow inks as the background for the card! 


I've used  Incandescent Copper with the cling film technique.The heart embellishment is embossed with Moonglow Holly Red Gold Embossing Powder, I've stamped into it with my favourite stamp at the moment, Hero Arts S5449 Fabulous Flourish.  It's such a versatile stamp!!

I'll be showing how it's done at the show so do pop along for a demo.  If you haven't got a ticket, no worries, just pop along on Sunday and pay on the door. Show open: 10am - 4pm, tickets: £5


The next card is made with the  Tim Holtz Sizzix Bigz Die - Bigz Fanciful Flight


Again I've embossed it with the 2-tone Moonglow embossing powders. This time my background is made with Starburst Stains and the scrunch technique but has an added extra, black webbing spray.  What's that I hear you think!!

We'll I first used it well over 10 years ago and like everything crafty, you end up moving onto new things and forget your old favourites, well I rediscovered this as I was looking for something to add a finishing touch to a picture frame I decorated recently, and lo and behold I looked at the mirror I painted and spray at least 10 years ago that still hangs in our living room and voila, I dug out my cans!!  It's available in gold. silver, black and white.

If you think silly spray, you're thinking along the right lines except this is finer and more hard wearing.  I've been wiping my frame at home with a damp cloth for years and it's still as good as it was when I first sprayed it.  It comes out a little like silly spray, it's quite strange!  If you spray it onto your cards/papers in a plastic bowl/tray you will get a built up of the surplus that can be peeled off and punched. Another tip, it is whiffy, like a spray paint so do your spraying outside if you can.

As it's an aerosol spray, it cannot be posted for mail order, so if you see it anywhere and think you want it, then grab it while you can, don't umm and arr, it'll be too late when you get home!!! 

We'll have some at the show.  It's not a cheap product but it lasts and is so effective.

Here's a close up that show's the Moonglow Lapis Lazuli blue/gold embossing powder and the webbing spray background


If you can't make it to the show, then we have the EP's on the website on Special Offer at the moment and if you are at the show, we have a Show Special with them too!

I'll be back on Sunday with another card showing these techniques.

Have a great weekend!!

Jill

Thursday, 17 June 2010

Photos from Saturday's Moonglow Techniques Workshop


Here are some of the ladies busily working away at the Moonglow Techniques workshop on Saturday.  It was a day jam packed with splishing and sploshing, scrunching, embossing and generally having a good time crafting.  It was non stop all day, in fact we ate our lunch and got straight back to it without much of a break.  I didn't take loads of photos through the day, I plain forgot, so I had a frantic few minutes at the end snapping a few of their makes.

Their makes included various techniques using Starburst Stains, Moonshadow Inks, Moonglow Embossing Powders, Fusible Webbing, and Fabulous Filigrees.

I did manage to grab a few ladies to show me some of their work in the photos before they finished packing away before going shopping.
 
Here's Jean displaying her background made with Moonshadow Inks and salt.

And here's Jean's amazing Moonglow embossed grape filigree, I really loved how she did this and the 2-tone effect that you can just about see in the photo.  I know Jean used Royal Burgundy Blue Moonglow Embossing Powder for the grapes, I'm not sure which were used for the leaves.  Gorgeous!


Here's Shirley who has gathered some of her background papers together to put away and Barbara who is still toiling away on her lighthouse filigree.


Barbara finished her filigree and proudly presents it.


She did a great job, I had everyone adding the smallest amounts of Moonglow EP onto the filigrees, in order to add 2 tone colour, after a few layers of clear UTEE.  It was great when the colours landed in the right places which is a very fiddly thing to do and everyone made the effort to give it a go and they all did brilliantly!

Here's Barbara's lighthouse close up, my terrible photo doesn't do it justice, but I think you can see she has gold at the top, stripey colours going down and that pewter looks fab for the rocks at the bottom.


Now for some of the other ladies work.  Look at this stunning sunflower, the colours are gorgeous in real life.  The colours are all from the embossing powders.


It was added to the pile of papers made.


And more...


Didn't they do well!

As I said before, unfortunately as some of the ladies had packed away and were shopping by the time I took the photos, I didn't get take photos of everyone or everything and the photos of the filigrees aren't brilliant but I'm sure you'll get a little idea of what they were up to and how great they all did decorating them.


Now Stef, (middle RHS) is off to France (to see our friend Batty) and will hold a workshop at her place with Batty's friends to share the fun.  I am sure the ladies there will love having a messy play and also what she has made to show them.

All in all, it was another great day!!

Jill

Wednesday, 10 February 2010

More embossed Moonglow Fabulous Filgrees


I used Moonglow 2-tone embossing powders Midnight Emerald Obsidian and Midnight Copper Obsidian on the aspen leaf.  I just love the intricate detail on this, it is so tactile!  I really must stop stroking it and get round to using it on a project...


The gecko is embossed with metallics and stamped into with a patterned rubber stamp.


Again, Moonglow embossing powders in green, copper and bronze have been used before stamping with a patterned stamp design.


Not a great photo of this one, but detail has been added to the leaves and the outline of the 3 tulips with a permanent marker after the embossing powder has cooled.

Tuesday, 9 February 2010

Fabulous filigrees from last Monday's show


I showed these Moonglow Fabulous Filigrees on the show, they are intrically laser cut mount board shapes that can coloured embossed and used as embellishments, such as for the UTEE frame I posted about earlier this week where I used the anchor that had been embossed with Moonglow 2-tone embossing powders.  The powder above is the Razzleberry Plum.  While it was still hot I added some micro beads for texture.


I used various colours of Moonglow embossing powders on the butterfly above then stamped into it while the powder was still hot with a script stamp.  The stamp must be a proper rubber stamp, a clear stamp will be damaged.


Again various colours have been used on the gecko along with micro beads.


Just embossing powder on this kokopelli design, no stamping or beads. 

I love making these and if you saw the boards we had on the show you will have seen that I've made quite a few now!

The filigrees above are approximately 3", so more suitable to projects other than cards and are on offer at the moment at half price, £1.25 each.  We do have some that are smaller with 2 in the packs HERE