Showing posts with label The Stamp Man Challenges. Show all posts

Sunday, 3 June 2012

Make It For A Man Challenge


Our next fortnightly challenge started on Friday, Make It For Man, a chance to get some male cards made especially with Father's Day coming up this month

I decided to use the Stampendous clear stamp set Railway along with a little Fran-taged engine steam.


I used coffee for the background and kept it pretty simple, I just need to add some wording when it's ready to send.
I used:
Coffee

With the bank holiday approaching and having beautiful sunny days last week Ian and I decided to get out for an afternoon to make the most of the weather and knowing that it would likely be crowded there over the bank holiday.


We took the hairy mad monster to 5 rise locks in Bingley, shame that we just missed a barge going up by only just catching the last stage.


So far we've been lucky that the HMM doesn't leap into the canal but the little monster managed to find a really muddy puddle to roll in on the way back!!!


Oh for some more sunshine!!


I'm sitting here today wondering how my Mum is getting on, she's gone to London to see the Queen!!  At 5' she isn't going to see much in amongst the many people that will be there but like she said, she'll enjoy the atmosphere and excitement of the occasion.  I think she'll need her brolly though!!

Hope you are having a great Sunday!!!!

Jill x

Thursday, 31 May 2012

Card for a queen challenge


Our card for a queen challenge finishes tonight so there is still a little time to join in.   I am very late posting my card here.

I decided to use a technique I was reminded of a couple of weeks ago that I hadn't done for a while.

I used the Mardi Gras set of Starburst Stains as they are very regal colours, each  has a secondary brass mica colour.


The photos are quite dark so you cant't see very well but I've used the stains, glossy accents and tissue.


As I've got loads of Fran-tage glitters I also added some of them inside too to add some sparkle


I found a great ribbon to match, olive green and burgundy


 Then sat and added all the bling!!!


I used:
Acetate and Tissue
Crown button, brad, ribbon and yarn from ye olde shoppe stash!!


I hope you all have a great time this coming weekend with your Jubilee celebrations, enjoy the bank holiday!

Jill x

Friday, 4 May 2012

Your Favourite Technique

Our challenge for this next fortnight is Your Favourite Technique.


I admit that even I think I've gone a bit OTT with the bling on this card!!


Stampendous CRP147-R Cling Butterfly Post


Our very talented American teamie Angela is hosting this challenge and the design team have all used different techniques so there is quite a selection to see.

We hope you can join us for this challenge, you have about 2 weeks to show us YOUR own favourite techniques.

Jill x

Sunday, 22 April 2012

Fran from Stampendous on Create and Craft Tomorrow!!

I have just noticed that Fran from Stampendous is going to be on Create and Craft TV tomorrow and Tuesday showing her Fran-tage technique!

So I thought I'd make a start on showing you the cards I made recently using these products/techniques.  I absolutely love it, it really is my thing!

The first card is my late entry for our Distress/Shabby Chic challenge


I used the following products that you will find on our website

Stampendous Cling Frantage 2011 - CRP144 I Love Paris
Stampendous Frantage Aged Gold Emboss Enamel (FREG024)
Woodware Crafty Edger - CP43-SET - Starter Set
Woodware Cassette Border - CP43-01 - Antique Floral
Woodware Blending Chalks (2887)
Woodware 80 Gold,80 Silver - Mini Heart Brads (JL104)
Woodware Dragonfly Brads (50) Bright (JL122)
Sakura - XONB11 - Gelly Roll Quickie Glue Pen
Sakura - XPFKC51 - Pen Touch Calligraphy Marker Gold - Medium
12" x 12" Vellum Pack - Pastel Colours - pk 12 sheets

Although with true Fran-tage I should not perhaps have used the Quickie glue pen around the edge of the card, just dipped the card into the powder and heated from underneath but I found I got a better random edge squiggling the glue along the torn edge, the kraft card underneath is edged with the Pen Touch gold pen. The chunkiness of the Fran-tage powder really adds texture.


I have enjoyed revisiting blending chalks, I recently demonstrated with them at the Harrogate show and although I already have chalks, I was using the Woodware chalks which I love and they are very reasonably priced too.

I made a little tag to hide the springtime wording on the stamp design to make it more usable image all year round.


Please visit our Challenge blog if you'd like to join us this fortnight

The second card uses most of the same products as above but I have used the border design from the Stampendous CRS5031-R Cling Jumbo Hollyhock set.


I have used the Aged Gold Fran-tage chunky embossing powder with the border stamp.  I think this is my favourite colour (at the moment!).

Sorry for making you have to tilt your head to see the cards, I was trying to get a good angle in the light as it has been dark and gloomy today, I didn't realise until afterwards how wonky they are!!


I'll show more cards tomorrow that have a lot more Fran-tage technique on them.

Thanks for visiting!

Jill x

Friday, 9 March 2012

New Challenge - Vintage Theme - Part one!


Our new fortnightly challenge starts today over on our Challenge blog HERE.  The team have made fantastic projects again, and I've certainly enjoyed playing making this embossed frame.

I bought 3 frames for £1, so a great bargain, and the photo was 50p (a local original from October 1928).  I just loved playing with the Stampendous Fran-tage products last September at the Woodware retailer day, I can see me having much more fun with them in future!

The great thing about new things is they can combine your old crafty bits and pieces and I used my old faithful Moonshadow inks to paint the wooden frame

The things I used are:

Moonshadow ink
Stampendous CRS5031-R Cling Jumbo Hollyhock
Stampendous Fran-tage mica and embossing powder mixes


The Moonshadow inks all appear brown when first applied
due to their walnut ink base.  The colour will show when they dry, as will the gorgeous shimmery finish.  Add one or more colours, they blend really well, even on wood.


Once dry I stamped with the border stamp in the hollyhock stamp set.  I then added more of the ink to one of the corners before adding the Stampendous Fran-tage embossing powders.  The ink held the powders in place like an embossing ink normally would on card. Using the ink made it more random than applying the ink from an ink pad.

I added some of the Shabby Chic colours to the metallics.  You need to hold your heat gun far away until the powder starts to melt otherwise it flies everywhere.  If you have a heat gun with a low setting or one of the hair dryer type guns then they are the best to use.

When using Fran's Fran-tage technique on card you would normally hold the heat gun underneath so that the powder doesn't fly about.  This is a slight variation, but still using Fran's encrusted jewel technique.


While the powder was hot I added some mesh ribbon then sprinkled and heated more powder on top to make sure it was embedded.  Test and make sure that your mesh is heat resistant before you add it!


I had some left over pieces of metal that are ideal for embedding into the molten embossing powder to add more texture.  Keep building up the powder for extra texture


Well, as blogger won't let me add more photos to this post I will continue with it another time, probably when I get back from our show this weekend at the Nissan Sport and Social Club in Sunderland.  There's packing and lots to do today to prep for it.  The show is open on Sunday from 10am - 3pm.  Show details are available here:  http://www.rosspapercraftshows.co.uk/

If you are able to attend the show do visit our stand as I will have this frame and other new things to show that I am working on plus other products that I will be demonstrating.  We will have some lovely new stamps and things with us plus lots of bargains for you too!

If that's not local, we'll be at the Harrogate show next weekend, maybe we will see you there.

Thanks for visiting, have a great weekend :)

Jill x

Friday, 2 March 2012

Colours of Spring / Easter Challenge


Well, we are one week into our latest Stamp Man challenge, there is still time for you to join in as the challenge ends on Thursday at 9pm.

I'm only just getting round to adding my entry and chose a deep almost mustard yellow which is a favourite shade.

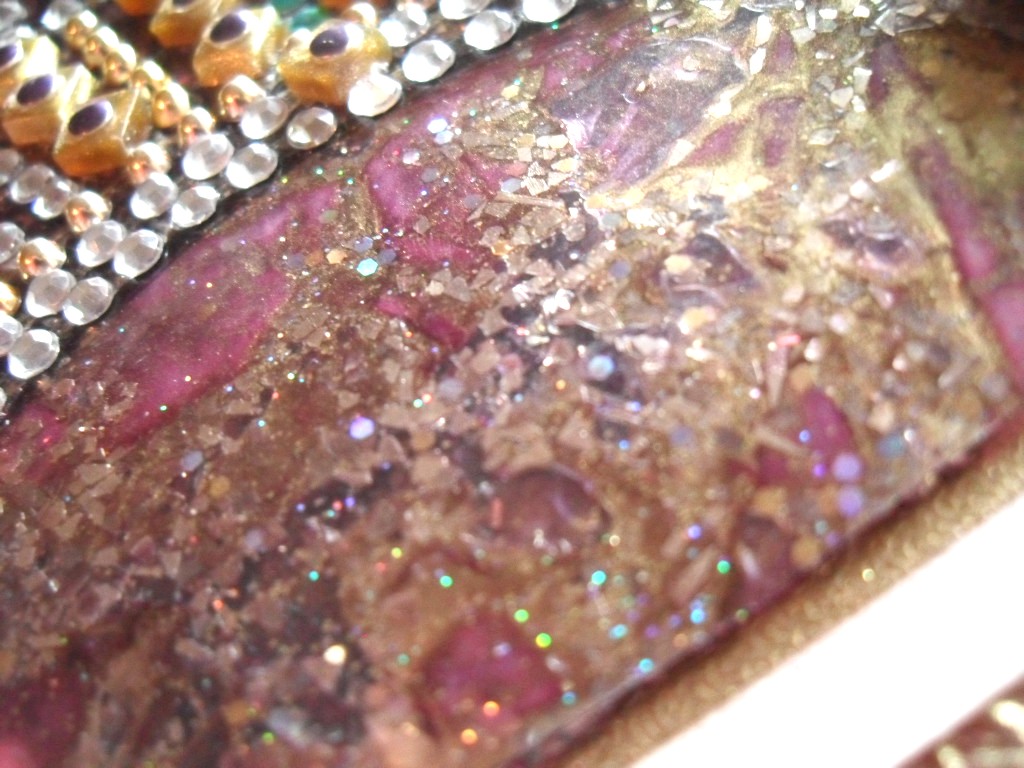
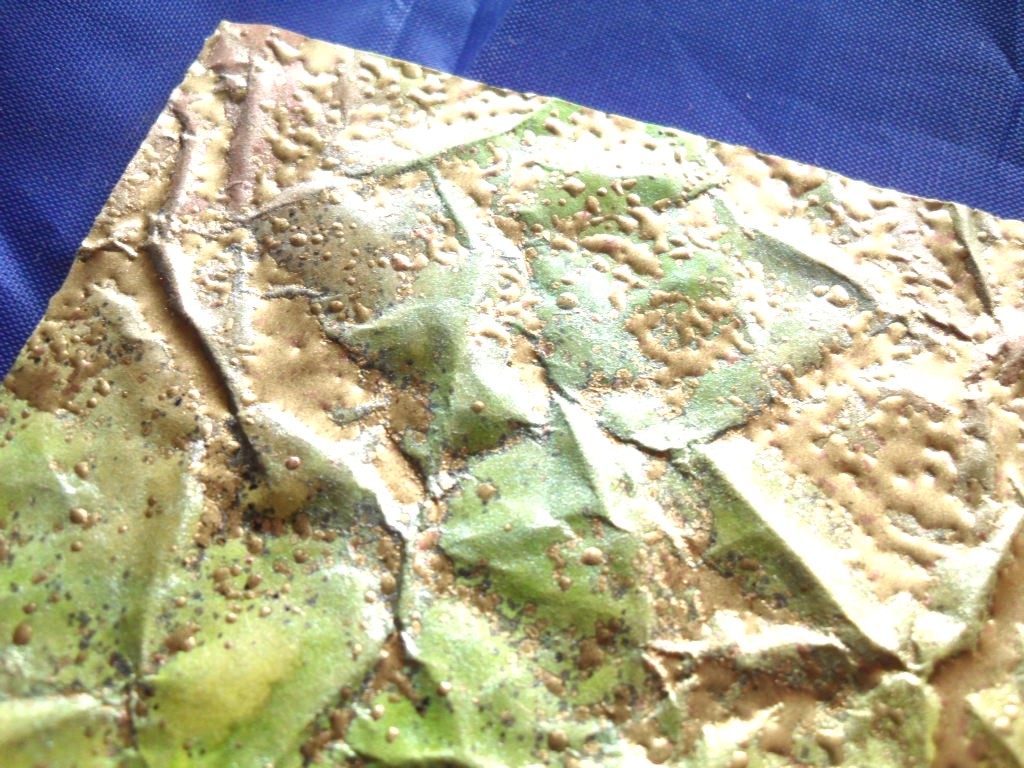
I have wanted to play with the Stampendous Frantage embossing powders so chose the aged gold.  The picture above shows this combined with a scrunch Starburst Stain background paper I made a while ago.

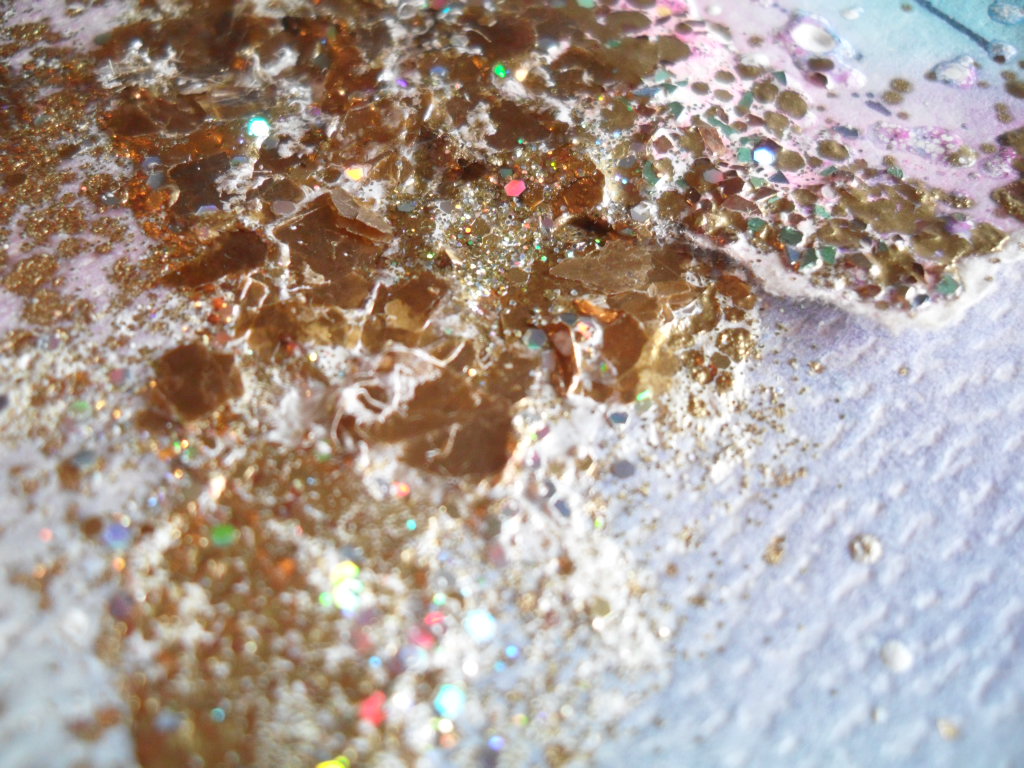
Normally when I emboss these background papers I gently swipe my embossing pad over the peaks then add the embossing powder to highlight and make texture.  This time I poured the embossing powder onto the dry paper and moved it about with my hand until it fell into the recesses.  I then carefully heated it from underneath.


I wanted to add more texture to the border, so used the same card  that was an offcut from the main image.  I frayed some white mesh ribbon and coloured it with alcohol inks.  I used alcohol inks rather than normal ink as the ribbon has a coating.


The products I used are

Stampendous CRP152-R Cling Botanical Daffodil
Stampendous Aged Gold Fran-tage Embossing Enamel
Starburst Stains
Mark Richards Self Adhesive 5mm Mosaics - Gold (MR5537)
Mark Richards Self Adhesive - Metals - Gold 3mm (MR1983)
Buttons
Mesh ribbon
Copier paper for scrunch technique

I love the randomness of Fran's Fran-tage embossing technique, you can see it on the border strip below.


I added a bit of bling too, the gold button was nicely textured and I added some gold mosaics, I really must use them more often!


So, I hope you will join in with our latest challenge too!

As I'm going on about the challenges, I would like to welcome our newest DT member, Kim Reygate.

I've know Kim for many many years, she is a very talented card maker and a very lovely lady too.  Kim has written a couple of books, one on tea bag folding and the other rubber stamping and is frequently featured in magazines as well as producing artwork for a number of other paper crafting companies.  We are proud and honoured to have her on our team.

Here's the link to Kim's blog Kim x, you'll find amazing artwork there and I believe Kim is on a mission to blog every day if she can so it's well worth you bookmarking or following her too.

We have a new challenge starting on Friday so I'd better get this current challenge card posted and get on with the next one!

Thanks for visiting

Jill x

Sunday, 12 February 2012

New challenge - Texture


I'm late joining in with our DT for our latest challenge hosted by Neil which is Texture.

I started the main piece quite a while ago and hadn't done anything with it.


I made the main daisy (below) using the new fibres but the rest of the piece is made from leftover pieces from other projects that I re-ironed and fused together.  The daisy above was pre-stamped and cut out then added into other leftover fibres as a complete image.

Below you can just about see pieces that have black stamping which was from leftover pieces I had when I'd cut a stamped wording background with a Sizzix die, some are pieces left after I cut out stamped images.

You can also just about see some Mica Flakes that I added for extra texture.


The piece has quite a lot of texture that I've tried to capture in the photos, there are a few stamped and cut out pieces in the picture below, I used even the smallest pieces of snippings, so nothing is wasted!!


As well as Mica Flakes I also added some leafing flakes before ironing/fusing together.

The picture below is from a different angle catching a different light, it is not quite as vibrant as the other photos as it isn't catching the  highlights of the fibres and Mica pieces. I've included the picture to show how distinct the colours are and how they change in different lights/angles.


The items I used are:-

Aspects of Design 28 - Double Delights
USArtQuest Dicrofibres
USArtQuest - Mica Flakes - Copper
USArtQuest - Gildenglitz - Variegated

If you visit our website you may spot a new page at the top that I have made so I can tell you about new things, updated things and other general changes.  As the website is growing I thought it would help us all as one thing I know is that I still need to add more photos!!

I have noticed this weekend that since I finished updating all the photos in the Dreamweaver section we have had more orders for those products.   A lot of the sections have the full product range but still without pictures and I know it is the photos that bring the products to life.  I'll keep adding more pictures but if there is something specific you'd like to see then please let me know and I'll try to get a picture for you.   From now, as I finish a category, I'll mention it on the new updates page.

Anyway, back to the latest challenge, I hope you will be able join in, the challenge blog can be found HERE.

Thank you for visiting

Jill x

Friday, 15 July 2011

Anything by T!m challenge


It's time for a new challenge over on our challenge blog, it's another Anything by T!m theme!  

For any newbies, Tim Holtz has designed many great products for us to use for our crafting.  If you haven't seen Tim's products before, you will find many of them HERE, just click on the ink pad and explore!!  It'll open up a whole new world of crafty bits and pieces for you:-)

Our Design Team have come up with really awesome projects for this theme.  Even if you are not able to enter this time, you really MUST see the work they have all put into this fortnights challenge, all such beautiful projects.

I started this technique board ages ago and finally put some finishing touches to it for the challenge.

I used the following products


7- Gypsies stickers - in shop
Rock Candy

Now for some close ups, sorry the photos are not brilliant


I was really pleased to get great crackle from the rock candy!!


You definitely need to pile the rock candy on to get the effect!


I had to include some stamped UTEE too


And, the gadget gears were a must have


Yes, there is quite an assortment of bits on this hanging but the whole point was to play with techniques and I certainly enjoyed playing!!!

I'm hoping blogger auto posts this for me as Ian and I will be on our way to Doncaster at noon for the Summer Crafting show at the race course.  Please come and say hello if you are at the show!

Have a great weekend, whatever you are doing.

Jill x

Friday, 17 June 2011

Butterflies and Dragonflies challenge - starts today!


We have a new challenge starting today over on our challenge blog, I hope you will be able to join in the challenge with us, especially as it is a very popular theme, butterflies and dragonflies.  

We also have a new design team member, Angela, who is hosting her first theme with us.

For this card I used the following...

Cuttlebug Embossing Folders:  Jules Jewels and Swiss Dots

If you are out and about near Skipton this weekend you are welcome to call in to our last open day at the unit.  We will be open from 10am - 5pm, Janet and Michelle are running 3 mini workshops throughout the day (you need to book these) and I will be demonstrating too.

Have a great weekend!  

Jill

Friday, 22 April 2011

New Challenge - Can you RESIST it?


Crikey that fortnight flew by again...

It's Lisa's turn to host this challenge and the theme this time is resist techniques.

I've a few resist techniques on this card, the photo below shows 2 of them, I used Tim's new Distress Stains on the new Kraft paper, the papers have a pre-printed resist pattern on them, this piece has words and numbers in resist.  I also embossed the Blank Canvas Framie 5 stamp with white embossing powder and inked over the top with distress ink.


There's a lot of texture on this card as I used a ribbed card for the base 8" x 8" card and coloured it with Distress Stains.  I also used Tim's compass mask.


The green card at the bottom of the picture below is from Tim's new Core'denations Distress Paper Pad that has a lovely texture to it too.


Another piece that has resisted, is the anaglypta wallpaper below, I used Distress Stains on it and it worked really well.  Sorry the photo isn't very good!


I added an old piece of map with a game spinner and cog, the stickers are 7 Gypsies that we have in the shop.


I couldn't help but add these cogs to the bike wheels, the back wheel looks a bit wobbley here!


And finally, the card when closed


I used quite a few products on this card, they are:

Tim Holtz Ideo-logy - game spinners and sprocket gears
7 Gypsies stickers - from shop

I hope you will join in with our challenge, you have 2 weeks to Resist It!!

Jill