Showing posts with label Starburst Stains - French Country. Show all posts

Thursday, 10 December 2009

First Christmas Card... Done!!


Good evening!

Here's my first christmas card finished!  It's a variation on the easel card I showed on Sunday.

Rather than using a square that is the same size as the card as I did on Sunday's card, I have used the largest label 5 Nestability for the gold mirri card mount, and the next smaller size for the next mount which was some Starburst Stained card with the cling film technique that has also been Cuttlebugged with the Swiss dots folder and then sanded to show the original white card I used for the stain background.

People often ask what I do with all the background papers I make when I'm demonstrating at shows.  As you can imagine I get quite a pile together after a day at a show, so I've put alot to good use this Christmas.  I used the Poinsettia Nestability to cut from a variety of background papers including the Scrunch, which has a brilliant texture for poinsettia leaves/petals and I was happy to discover cuts really well with the nesties.


Now then what would you call them... poinsettia leaves, or petals?  Do you think it is leaves or petals that make them flowers, are they flowers?  I guess it is the green leaves that are leaves and when they become red they are petals?   Anyway, I'll move on from that thought, I'm getting myself confused...


I've tried to vary the layers with some other techniques.  I made lots of these flowers on Sunday, in fact Ian came to see what I had been doing for 5 hours and I confessed I hadn't finished a single card but I had made a nice pile of poinsettia flowers!!  After 20 years of doing this sort of thing I don't get the 'look' anymore, he just accepts that that is the way things are, he doesn't even shake his head anymore. 

These were made from the French Country starburst stain set (hence that gorgeous burgundy) but I think the green came from the Holiday Wreath set which I have also used to make the flowers in more traditional colours of red and green.

I shaped the card pieces and used 3 yellow brads to hold them all together.

The wording is raised on pads to hold the easel in place.


I have started more of these, I get bored doing the same design so I'll show the other layouts/colourways when they are finished.

I have taken some photo's today of the cards Jo made for the TV show, will show them tomorrow when I've transfered them... so do call back.

Thanks for visiting, and again for leaving all your comments.

Jill

Sunday, 6 December 2009

Tuesday Taggers Blog Hop here today & tomorrow!


Good morning and welcome to all the Tuesday Tagger blog hoppers!

I mentioned in yesterday's post about the prizes we are sponsoring, so scroll down if you missed that info yesterday.  Basically Tracey, Debbie and I are each sponsoring one of Tracey's recent unmounted stamp sheets each.  My sheet is the Classical Instruments from which the above card has been made.  I'll give more details about it after the blog hop info.


If you would like to join in the Blog Hop, then you will need to go to the Tuesday Taggers Blog which is your starting point.  You will find the instructions there.

For those that have already started, well done on getting this far.   I'm going to hop along too just for the fun of it and I'm sure I will be tagging along at the end as I'm sure to get sidetracked reading everyone's blogs along the way!

Just to check you are hopping in the right direction, you should have arrived here from Avril's Blog, if you have missed any of the hops you may want to go back to the beginning and check through from the Tuesday Taggers blog which is the starting point.

The letter you need from me is an O!  Don't forget to leave a comment for a chance to win a prize!

Your next visit should now be to Janet's Blog.

Thank you for joining in and I hope you have enjoyed your journey so far!

*  *  *  *  *  *
OK, back to the card...

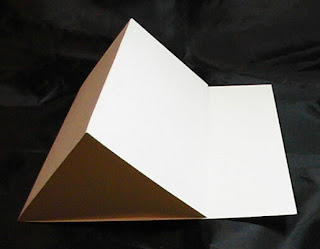
The next couple of pictures shown the fold for the easel card, it is so simple to do.  You can use any shape or size card, I've used a 4" square card (that was already folded in half).  Now fold the front of the card in half so that the mountain fold is at the front.


This is how the fold should be made. 


You will need to cut a separate piece of card that is the same size as the folded card, I used a 4" square piece cut from a sheet of Starburst Stain/cling film technique.


Here's the same technique but in a different colour.  Both are from the French Country set.  Amaryllis Burgundy and Jack in the Pulpit Teal.


You can decorate as much of the card as you like, I did the back top panel and half of the bottom base with the same stain card but left the inside triangle part blank. 

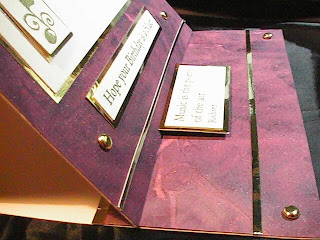
I embossed the trumpet and all the wording with gold embossing powder.  I then layered them onto gold mirri card. 

I added double-sided tape to the back of mirri card then cut thin strips for borders (they aren't peel offs), so it would all match, I also added gold brads.  Here is a side view of the finished card.


I used wording on the bottom piece, lifted with foam pads, to hold the front panel in place.


To close the card to put in an envelope, lift the front panel and it will lay down to form the original 4" square card.

Thanks for visiting,

Jill

Tuesday, 15 September 2009

The Stamp Man's Summer Blog Candy Giveaway

*** NOW CLOSED ***

THIS POST WILL REMAIN AT THE TOP OF OUR BLOG UNTILTHE WINNER IS ANNOUNCED AND THE PRIZE HAS BEEN CLAIMED.
FOR MORE RECENT POSTS PLEASE SCROLL DOWN.

I've been nattering on about the French Country Starburst Stains for quite a while and had lots of enjoyment using them myself so I've decided to treat a lucky winner to this set. I've included some white blanks to stain, such as doilies, paper lace and a chippie album etc to get the winner started and also included some co-ordinating card, yarn and ribbon. The picture doesn't show it but I will be including a DVD I made about the basics of Moonglow products, it will help with techniques to try with them. The DVD mainly shows the techniques with Moonshadow inks, but they are the same techniques for Starburst Stains. The candy contains:-

Set of French Country Starburst Stains
Four rolls (2 metres each) of Paper Lace
Various sizes of doilies
Pack of tags
Square Tab Chippie Album
Luxury pack of mixed yarns and ribbons
Variety of ribbons
15 sheets of card
Card of various yarns
Moonglow DVD for techniques

For those with blogs - to enter all you need to do is leave a comment below this post and spread the word on your blog by putting a picture of this blog candy onto your blog linking it back to this post. If you would like to sign up to become a follower that would be great, as we'd really love you to follow our blog, but is not a requirement.

For those without blogs - please leave a comment below this post. Please note that you will need to leave your full name within the comment to be entered, otherwise anonymous entries cannot be accepted.
One entry only, duplicate entries will not be counted.

Unfortunately due to postal costs, this time, the candy is only open to UK residents.

This candy will run from today until midnight on Monday 14th September. The winner will be selected at random and announced by Wednesday 16th September. We will not contact you direct so you will need to check back then to see if you have won. Further details will then be posted on how to claim your candy! If the prize has not been claimed by midday Friday 18th September a new winner will be drawn.

GOOD LUCK EVERYONE!!!

Please continue to our latest post below...

Sunday, 23 August 2009

French Country Funky Flowers


I hope you are having a nice weekend, or should I say had, as it is nearly over as I post this.
This was a quickish card to make using Kay's Funky Flowers and Fancy Flourish stamps. I coloured the main image using French Country Starburst Stains, the same set as the giveaway. I misted the pre-printed background paper before stamping the flourishes over the top. I also stamped them on the yellow mount. The wording is from the flourish stamp sheet. Yellow and white brads plus a little white yarn are used as embellishments.

Thursday, 6 August 2009

Paperwork or Play?


I've had a lovely day, a lady asked yesterday if she could call back today and have a play with the Starburst Stains and Moonshadow inks with me so what am I do? Do paperwork or say yes and play? So we played. It was arranged that her husband would go for a walk and come back in a couple of hours. It was only afterwards I realised that the lady had told me yesterday when she first arrived that it was her birthday the next day, and duh, I didn't remember until this evening!! So a belated happy birthday to you!

After we started splishing and sploshing another couple arrived who were also on holiday, and we sort of highjacked the lady from her husband! She really wanted to join in so after playing for a while they went for lunch and she came back later to play and shop while her husband went sightseeing alone. Two good husbands there! The ladies are up and running with some techniques now.

Hilary (a regular customer) came this morning with yarns she no longer wanted and asked if I'd like some, ummm, would I? She had 2 bin bags full, you should have seen the look on Ian's face when he caught me delving to the depths of a bag to make my selection. He shook his head muttering something about giving up... I am supposed to be having a clearout myself at home, I am such a horder of stuff, I just like adopting things, mainly crafting things or things I can use for it, I have no hope of ever living minimalistically.

Anyway, I sorted the ones I wanted into sets, as you do, and came up with a perfect combination of all the colours in my favourite French Country Starburst Stains set. I think I'm getting a bit too obsessed about this set now.

Hilary dropped the rest of the yarns off at a charity shop so a good time for anyone who wants yarn in the Skipton area at the moment.

Yesterday we had an unexpected visit from a gentleman customer who we haven't seen for 5 years as he's been through a bad time healthwise. Norman first shopped with us when we had just moved into our old shop about 17/18 years ago. I wonder if anyone out there remembers Norman attending our demonstration days, it was lovely reminising with him over a cup of tea.
Today's photos are of the dark pieces of stained card that I ran through the Cuttlebug with the swirl folder. I then sanded the embossing so the pattern pops out giving a distressed effect.
Jill

Wednesday, 5 August 2009

Is anyone still visiting?

Sorry I haven't blogged for a while, what with our holiday and one thing and another I've been AWOL. Thank you for the messages you left while I was away, they are much appreciated.

I made this gatefold card on Saturday, using some of the backgrounds I'd made with the French Country Starburst Stains. I ran the piece through my Cuttlebug in the Swizz Dots folder, then sanded it to allow the dots to appear white, a very satisfying technique! I detail painted the flower image with the French Country stains to match. The flower image is of course one from Kay Carley's new stamp sheets. I seem to using them for everything at the moment, I absolutely LOVE using them.

Followers of Kay's blog will know that she now has a winner for the blog candy, congratulations to Cathy, lucky you. I have been using Kay's swirl stamp set and they too are lovely to use. I will show another card that I used with the swirls another day.

My camera is still broken, and Debbie is on holiday, (probably glad for a break from taking my photos for me I'm sure), so I'm using my mobile at the moment so expect some naff photo's for a while. It's my birthday at the weekend so I'm hoping the camera problem may be solved!

Now that Kay's blog candy has finished I will be starting a new blog candy giveaway as soon as I have decided what to offer and have a photo of it, so please call back.

Jill

Friday, 10 July 2009

French Country Starburst Stains


This is my favourite set at the moment, if you look in the labels on the side bar you'll find some more card ideas that I've posted before.

The colours in this set are:

Amarylis Burgundy, French Lilac Violet, Jack in the Pulpit Teal, Marigold Yellow Orange, Wisteria Purple Blue.

The first 2 pictures featured in recent posts, but the other 3 are backgrounds made with the noodle brush that I have dipped in water then swiped across the background, while it was still wet I added embossing powders and heated. It takes a bit of practice to get the right amount of water, I usually give the brush a little shake, hold the card up to the light and keep an eye on where I have water before adding the powder otherwise it is easy to end up with an embossed blob! I like using these backgrounds for oriental cards, as per last example.

Sunday, 14 June 2009

Funky Flowers & French Country S. Stains

Back to cards today.

I made this card with Kay's Funky Flowers stamp sheet and French Country starburst stains. I detail painted the flower design with the stains then misted over with the stains.

The bottom half of the card is made by mopping up spillages on my craft mat.

The top panel is vellum stamped with one of the fancy flourishes stamps in white Stazon. Curly clips, brads and organza ribbon have also been added to finish off the card.

Jill

Friday, 12 June 2009

Janet's Tag Book & HSNW


Starburst Stain Tag Books
Janet (W) recently attended this workshop and has kindly scanned the book for us. Apparently she has another on the go too. Lovely colours! We used the French Country Starburst Stain set and stamps from all 3 of Kay's new stamp sheets. The images were embossed with detail white embossing powder. The cover, with the large flowers in the third picture is anaglypta wallpaper that has been stained, it resists and gives a lovely textured effect. The middle flower was also punched from the wallpaper. The book is made with the large scalloped tag Sizzix die. Thanks for letting us look Janet.

HSNW Stamping Group

I did mention earlier this week that I would mention what this group is celebrating this year, and celebrate they should...

Way back, a group of ladies were attending a workshop by Caroline Rawcliffe, the words ..... "perhaps we could start a club" were spoken and there it was, a challenge for them. In August 1995 the first meeting took place in the home of one of the ladies and they have met monthly since November 1995. They held a competition for the club name and have been growing ever since. Larger premises were needed to accommodate all the members and after the 2nd move, they had to cap the number of members to 60.

As there was a lack of shows in the area at the time, in 1998 they decided to organise one of their own which was attended by 12 retailers initially and 500 shoppers. By 1999 it had grown and such was its popularity 2 shows were held a year, in the Spring and Autumn.

As a retailer attending the shows I can vouch that these shows are well organised and have such a lovely atmosphere. It is obvious that all members, not just the committee, get involved helping to make it the success that it is. Their hard work is so worthwhile.

This is not an advert to gain them more members or to help sell tickets for their shows as they are their own advert. Club membership is full, there is a waiting list for exhibitor show stands and, they had to go ticket only for the shows a few years ago as too many people wanted to visit.

I wanted to give brief details of what they have successfully achieved, and thank the group for all the support they have given us retailers over the years. I'm sure that everyone whether a member, shopper or retailer appreciates it. It is a shining example of what a group of crafters can achieve with a stamping group.

After all their meetings and 20 shows in 10 years under their belts, I hope that they continue to thrive along with other groups like them around the country.

Thanks to everyone that has commented and joined as followers today.

Jill

Monday, 8 June 2009

Sunday, 7 June 2009

French Country/Funky Flowers & Frames Book, p2 & 3

A look at pages 2 and 3 of the book today, I will post more detailed descriptions during the week.

If any ladies from the HSNW group have photographed their books and would like to share them here, please email them to me, I would love to see them all. It was great seeing people being creative and doing their own thing with the items in the kit.

Thank you for your comments, I will catch up with replies another time.

Jill

Friday, 5 June 2009

HSNW Workshop

Here's a preview of the book that the HSNW stamping group will be making at the workshop tomorrow. I'll post some photos of the inside next week.

Have a good weekend!

Jill x

Wednesday, 3 June 2009

Starburst Stains + Surgical Spirit = Alcohol Inks!

Research and Development!

A few weeks ago I had a little play as Tracey, owner of the company that makes the Moonglow products emailed me about an idea she tried, it seems an obvious thing to try, once you know about it!

You may know that Starburst Stains come in the bottles and jars as a ready mixed formula that you need to add hot water to when you get them home. Therefore as the water isn't in them when you buy them, you can add other things!

Now Tracey said to use rubbing alcohol, which according to the chemist is surgical spirit. I needed to have an experiment with it so I tried filing a half bottle first and then found I could fill the dauber bottle with the same amount of surgical spirit as you would normally add water and still get the same colour shades as when you add water. I left them a while to activate as you normally need to when you add the hot water.

Bearing in mind you cannot do this if you have already added water to a set, you will need to decide if you want your new unused set as alcohol inks or the normal water based product. If you think this is something you'd like to try then perhaps mix a new set putting half the formula into another container with water and mix the other half with surgical spirit.

Be warned it does smell!! If you don't like the smell of surgical spirit, then this definitely isn't for you as the even the card takes a while to lose the smell. The smell reminds me of some mint sweets I bought in the US, I think they were called Wintermint, it was mentioned by someone that tried the sweets that they tasted of TCP, so it is that sort of smell if it helps!

A plus point to making them into alcohol inks is that the Starburst Stain set colours are lovely and work so well together and will match projects you may already have with the waterbased version.

Anyway, I filled the dauber bottle with surgical spirit (about £3 for a large bottle) and gave it the usual shake to get the mica mixed, then I tried it on glossy card and also on normal smooth stamping card. It works really well on both and using the gloss and matt card gives a different finish.

I liked the idea of applying it with the dauber top directly onto the card, I'm not sure I would fancy spraying it. I dabbed the inks onto a non stick craft sheet, swiped the card onto the mat to pick up the colour, then filled some of the white gaps on the card directly from the marigold yellow orange Stain dauber bottle.

When the card dried it left a residue of mica on the surface which I just wiped off, and I ended up polishing the card to a high sheen. I stamped one of the flower stamps from Kay's new Funky Flowers stamp sheet and as I didn't have the alcohol inks with me when I got around to colouring it, I used my normal water based French Country set to detail paint the flower.

I used 2 of the alcohol ink flowers that Debbie made for me a couple of weeks ago as an embellishment along with the new pink Woodware nailheads (metallic self adhesive dots).

When I have more time I will play a little more and let you know how I get on.

Jill

Tuesday, 28 April 2009

Another Tag Book with French Country Starburst Stains


Here's another tag book, I've used Moonglow Fusible Webbing on the panel showing on the first picture with white detail embossing powder to create a lacy effect.

French Country and Lace Tag Book

I used the French Country Starburst Stains to create the backgrounds in this book, I misted through a doily for some of the backgrounds and them used the coloured doily as well.

I embossed the large lace background stamp onto white vellum using white detail embossing powder. Some of the pages have the lace border designs that are embossed with Venus Violet Blue Moonglow Embossing Powder as well as the white detail. I can spot a noodle brush background that has been embossed with the same EP.

The front cover is acetate stamped with white Stazon ink with words from the Aspects of Design Butterfly Garden sheet. I coloured some of the ribbon with the stains so that it would co-ordinate with the book and added some charms.

French Country Agapanthus Card

I've embossed the Agapanthus Bloom stamp with White Detail embossing powder for the main image and the Agapanthus Cluster on vellum for the background. The background colour is made with the French Country Starburst Stains.

Agapanthus Bloom and Butterfly Garden stamps


I've used another of collection of Agapanthus stamps, this time the Agapanthus Bloom. The wording is again from the Butterfly Garden Stamp Sheet. I've used the French Country Starburst Stains this time, (another of my favourite sets). For the embossing I've used Moonglow Venus Violet Blue and then White Detail on the Vellum wrap. The curly clip helps hold it in place.