Showing posts with label Moonshadow Ink. Show all posts
Showing posts with label Moonshadow Ink. Show all posts
Saturday, 26 May 2012
Encrusted Jewel Technique Vintage Photo Frame
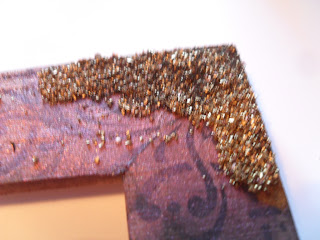
I finally got round to taking a photo of the frame I made for the workshop last weekend. I made another frame using the Ikea mirror that the ladies were going to decorate as the smaller frame is no longer available (typical!) but it did give us a bigger area to work with.
It is the type of project where no 2 frames would be exactly the same so I wanted to decorate the new frame to give the ladies something visual to look at while at the same time, adapting the techniques for their own frames.
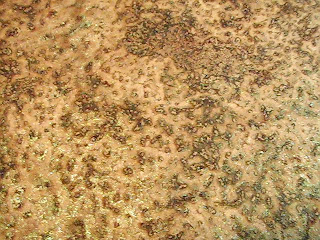
It is really hard to capture the colours of the Moonshadow Ink and the gold embossing so I took these photos outside in the sunshine today which has helped a bit.
The frame is stained with Moonshadow Ink and stamped with Stampendous Elegant Border stamps.
I made up a magical mix of embossing powders, fragments, glitters etc, then added aged gold and shabby white embossing enamels randomly.
Ribbon was embedding in the embossing here and there too and also stained with Moonshadow Ink before fraying and adding to the centre
One of the reasons I'm only just getting round to posting this is that I was floored by a really nasty bug this week, thankfully it is gone now, it's far too hot to have a bug!
I hope you are having a great weekend and enjoying this lovely weather, keep cool :)
Jill x
Friday, 9 March 2012
New Challenge - Vintage Theme - Part one!
Our new fortnightly challenge starts today over on our Challenge blog HERE. The team have made fantastic projects again, and I've certainly enjoyed playing making this embossed frame.
I bought 3 frames for £1, so a great bargain, and the photo was 50p (a local original from October 1928). I just loved playing with the Stampendous Fran-tage products last September at the Woodware retailer day, I can see me having much more fun with them in future!
The great thing about new things is they can combine your old crafty bits and pieces and I used my old faithful Moonshadow inks to paint the wooden frame
The things I used are:
Moonshadow ink
Stampendous CRS5031-R Cling Jumbo Hollyhock
Stampendous Fran-tage mica and embossing powder mixes
Once dry I stamped with the border stamp in the hollyhock stamp set. I then added more of the ink to one of the corners before adding the Stampendous Fran-tage embossing powders. The ink held the powders in place like an embossing ink normally would on card. Using the ink made it more random than applying the ink from an ink pad.
I added some of the Shabby Chic colours to the metallics. You need to hold your heat gun far away until the powder starts to melt otherwise it flies everywhere. If you have a heat gun with a low setting or one of the hair dryer type guns then they are the best to use.
When using Fran's Fran-tage technique on card you would normally hold the heat gun underneath so that the powder doesn't fly about. This is a slight variation, but still using Fran's encrusted jewel technique.
While the powder was hot I added some mesh ribbon then sprinkled and heated more powder on top to make sure it was embedded. Test and make sure that your mesh is heat resistant before you add it!
I had some left over pieces of metal that are ideal for embedding into the molten embossing powder to add more texture. Keep building up the powder for extra texture
Well, as blogger won't let me add more photos to this post I will continue with it another time, probably when I get back from our show this weekend at the Nissan Sport and Social Club in Sunderland. There's packing and lots to do today to prep for it. The show is open on Sunday from 10am - 3pm. Show details are available here: http://www.rosspapercraftshows.co.uk/
If you are able to attend the show do visit our stand as I will have this frame and other new things to show that I am working on plus other products that I will be demonstrating. We will have some lovely new stamps and things with us plus lots of bargains for you too!
If that's not local, we'll be at the Harrogate show next weekend, maybe we will see you there.
Thanks for visiting, have a great weekend :)
Jill x
Labels:
Moonshadow Ink,
Stampendous,
The Stamp Man Challenges,
Vintage
Monday, 30 January 2012
The Stamp Man Vintage Style Embellishment Kit
I did say I would be back to today to give more information about our new Vintage Embellishment kit.
I have now added it to the website HERE
We sold these for the first time at the show in Leeds yesterday and we've tweaked them and added more to them today before adding them to the website.
The kits are all different so it doesn't seem practical to show photos of a full kit as it will likely be different from the kit you receive but the photos I've shown will give you an idea of the type of thing you will receive. We are also including a Moonshadow Mist and a Moonshadow Ink to enable you to make your own Vintage style background papers. There are many techniques your can with the ink and mist that you can play with, it is really good fun as you can use them with salt, cling film, bubble wrap, anaglypta wallpaper, textured papers and much much more! You can use them on wood and fabric (that's not for washing ie decorative purposes only), they will add another aspect to altering items!
The packs are great value and we hope that the people that missed out last time will be able to grab one of these new kits.
For those who have no idea what the Moonshadow Inks and Mists are I hope the link below will help. It has linked to a few of the blog posts I've made about Moonshadow Mists and Inks. The base of the Mists and Inks are Walnut ink with a shimmery mica colour.
http://www.thestampmanuk.blogspot.com/search/label/Moonshadow%20Ink%20Techniques
I really enjoyed the new show at Leeds yesterday, it was brilliant to catch up with old friends and wonderful to make new friends too.
I haven't unpacked everything yet but I'll show some of the embossed elements I made another time.
I'll be back with more news soon.
Thank you for visiting
Jill x
PS: This blog post is especially for Carol and Alan, look Carol, 3 posts in 3 days!! I'm spoiling you, lol!!! Ian sends hugs and kisses xx
Friday, 22 October 2010
Stamp Magic Show, The Dome, Doncaster
Are you planning to come to the show on Sunday? If so, you'll see these and others I have made this week in real life!
I will be demonstrating the technique Vix showed at the Port Sunlight show and also our demo weekend last week. It is transfering images/printed papers onto sticky back canvas. I'll also be showing how to make embossed embellishments with Moonglow 2-tone embossing powders. They really are magic!!!
I've also made another batch of Moonglow embossing powder sample pieces, ATC size, to give away, so that you can remember it when you get home.
The image below was transfered onto canvas from a lazer printed image. It has a distressed aged feel to it so of course it had to have my favourite Moonshadow inks as the background for the card!
I've used Incandescent Copper with the cling film technique.The heart embellishment is embossed with Moonglow Holly Red Gold Embossing Powder, I've stamped into it with my favourite stamp at the moment, Hero Arts S5449 Fabulous Flourish. It's such a versatile stamp!!
I'll be showing how it's done at the show so do pop along for a demo. If you haven't got a ticket, no worries, just pop along on Sunday and pay on the door. Show open: 10am - 4pm, tickets: £5
The next card is made with the Tim Holtz Sizzix Bigz Die - Bigz Fanciful Flight
Again I've embossed it with the 2-tone Moonglow embossing powders. This time my background is made with Starburst Stains and the scrunch technique but has an added extra, black webbing spray. What's that I hear you think!!
We'll I first used it well over 10 years ago and like everything crafty, you end up moving onto new things and forget your old favourites, well I rediscovered this as I was looking for something to add a finishing touch to a picture frame I decorated recently, and lo and behold I looked at the mirror I painted and spray at least 10 years ago that still hangs in our living room and voila, I dug out my cans!! It's available in gold. silver, black and white.
If you think silly spray, you're thinking along the right lines except this is finer and more hard wearing. I've been wiping my frame at home with a damp cloth for years and it's still as good as it was when I first sprayed it. It comes out a little like silly spray, it's quite strange! If you spray it onto your cards/papers in a plastic bowl/tray you will get a built up of the surplus that can be peeled off and punched. Another tip, it is whiffy, like a spray paint so do your spraying outside if you can.
As it's an aerosol spray, it cannot be posted for mail order, so if you see it anywhere and think you want it, then grab it while you can, don't umm and arr, it'll be too late when you get home!!!
We'll have some at the show. It's not a cheap product but it lasts and is so effective.
Here's a close up that show's the Moonglow Lapis Lazuli blue/gold embossing powder and the webbing spray background
If you can't make it to the show, then we have the EP's on the website on Special Offer at the moment and if you are at the show, we have a Show Special with them too!
I'll be back on Sunday with another card showing these techniques.
Have a great weekend!!
Jill
Sunday, 1 November 2009
Just a note with Classical Instruments!
 Here is another card made from Tracey's Classical Instrument stamp sheet. It was stamped with brown Stazon and painted with a green Moonshadow ink. I did a bit of manic stamping for the border with the same stamp by repeatedly stamping, sometimes without re-inking to give it a bit of depth. I then ran it through the Cuttlebug with the swirl folder to add some texture.
Jill Boulton had a workshop here yesterday metal embossing, I joined in and played too which was great, we tried lots of techniques, the elements we made need making into something so I'll show what we made another time.
I hope you are enjoying your weekend!
Jill
Subscribe to:
Posts (Atom)


