Showing posts with label Easel Card. Show all posts

Saturday, 20 February 2010

Today's workshop with a new Starburst Stain set!


Oh dear, it's been a long time since I last posted hasn't it!  I'm totally behind with blogland and have a lot of catching up to do. 

I've had a lovely day today, we had a workshop with 3 very nice ladies who came to play with Starburst Stains and learn some techniques.  It was especially good as we had a new Starburst Stain set to play with that only arrived yesterday. 

We started the day with a brilliance ink background technique that the ladies also wanted to try and then got stuck into the new set.  I had asked for a new set similiar to Icicle Creek, which is the palest set that has gold as the secondary colour.  


The new set is called Icicle and Snowflake which has the same pale shades as Icicle Creek but with silver as it's secondary colour.  It is really pretty and it is going to be gorgeous to use next Christmas!

We made lots of backgrounds with different techniques with the new set then moved on to the French Country set. 

Time flew by so there was a frantic frenzy to make cards at the end.  Here are the easel cards the ladies made.

Angela's card

Cynthia's card

Sue's card

Sue also managed to make this card.


Thank you ladies, you were great company, see you all at the Harrogate show!

This was a last minute workshop as we'd had to cancel the one just before Christmas so we finally had the chance to repeat it.

I will be sending out /emailing details of workshops up to June this week to those that have requested information.  There is a variety of classes, they are mainly technique based workshops, such as metal embossing, making an ultra thick embossed picture frame similiar to those that I've posted about recently,  techniques with Tim Holtz/Ranger products.  If you are interested please email us at thestampman@btconnect.com.

Thanks for visiting, enjoy the rest of your weekend!

Jill

Monday, 18 January 2010

Nautical easel card that didn't quite make an appearance on Saturday's show


If we'd just had a little more time in Saturday's show I may have been able to show this simple little easel card.  I did get it set up to demo and it was in front of me at the end of the show but, we just ran out of time. 

I'm loving making these easel cards at the moment.  I used the Nautical stamp sheet, again embossing with Moonglow Midnight Teal Obsidian embossing powder.

I used a combination of the green and gold sprays from the Mardi Gras Starburst Stains.  First for the scrunch technique on the bottom panel of the card....


...and also on another piece that I made using the dry paper stipple technique.


Sorry, the photos aren't brilliant but I'm sure you get the idea.

I managed to record and watch the show and at first cringed when I saw my grumpy looking face and all that giggling I did!!  And, why oh why didn't I take up the offer of a stool to sit on?  Thank goodness for the counter, I was leaning on it for support by the end of the show!   I've seen the funny side of it and I'm glad I didn't cancel the show now as I nearly did.  You have to laugh about these things don't you!!!  We certainly had a fun time during the show even if my face didn't look it:)  I'm hoping I can do another show with Leonie when I'm on better form!

Thank you very much for all your comments, my back is a little better now, I'm hoping, if I'm sensible, it will be much better by Wednesday.  Things were looking hopeful for all being back to normal for the next show then someone mentioned snow on Wednesday... Please... No more snow...

Well, another busy day today, still more prep to do for Wednesday's show amongst other things, so I'd better get on...

I will be back with more tomorrow.

Thanks again.

Jill

Friday, 18 December 2009

Traditional red and green easel cards with small square panels


Yes, more poinsettia cards, this time with more traditional Christmas colours.  Instead of making the extra front panel the same size as the card I have made the square smaller, both feature plenty of scrunch paper backgrounds.  If you have missed me mentioning them before, they are made from Starburst Stains and copier paper.  You will be able to see me doing this (again) on the telly (Create and Craft) on 16th January, Sky 671 or Freeview 36 if you have them. 

They have asked me to go back for a technique show and I'll also have the DVD I made with Moonglow products on the show, so I hope you can watch that especially if you haven't seen me doing all this stuff before. 


I used the Starburst Stains Holiday Wreath set for both of these cards, although I think a piece of scrunch from a different set with a paler green slipped in on the top card.

I am posting late tonight or is it early for today?  I am up late as I have been watching the snow falling again, it fell heavily earlier this evening and settled, even on the road.  Hamish loved playing in the garden earlier and came in with snow stuck to him, he had a cute white lump of snow on his nose where he'd been sniffing about and had scouped it up!  I guess we're going to be snowball throwing again tomorrow!

I do love watching it fall and the great scenery and peacefulness it seems to bring but don't like the fact that we are probably not likely to get out of the village until later tomorrow!

As you know we are based in Yorkshire and we do get our fair share of snow, we also live in a little village very high up so when we get it, it stays.  We left the car at the bottom of the drive this evening, at least we won't have to slide down that tomorrow!  It looks like the salt Ian put down on the drive this evening isn't going to help much, so I'm glad the car is on the road!

I'm just hoping it clears before Saturday as we have a workshop and I'm looking forward to playing with the Starburst Stains and Moonshadow inks with the ladies that are booked to attend!

This first falling of snow has been nice to get us in the mood for Christmas, we only want a little taster for now though!  It would be better if it just cleared up for the next week so we can all get our Christmas shopping done and then it would be lovely if it could snow from next Thursday night for a couple of days, so we can all have a wonderful white Christmas to enjoy!  I think we all deserve that this year:)

Jill

Thursday, 17 December 2009

Christmas easel card, scrunchy leaves, dotty C'bugs, nesties and winners...


Sorry, back to poinsettia flowers again for today's card after yesterday's chocolate box:)

Edit:  Just realised I've already shown this card on a previous post, so here's another!


************************************************


Well, as you can imagine, there were 3 very excited ladies emailing yesterday to claim their prizes, I am really very happy for them all! 

Congratulations you 3!  Kym, Pauline and Ann.  I hope their luck continues into 2010 and that they will share some cards they make with the stamp sheets with us as it is always so nice to see what other crafters make with our range of Aspects of Design stamp sheets. 

Kym was the first to claim her prize and she was especially excited as she had already had a great day, her son had passed his driving test (first time).  I think she was a little shocked at having 2 good things happening in one day!  Kym said in her email that she makes cards for charity so your choice of the Funky Flourishes is going to prove so versatile for you Kym!

Pauline couldn't believe she was a winner and Ann, well, as you probably gathered from Ann's post yesterday, she got a shock this morning when she popped by our blog, she checked and doubled checked, YES Ann, it really was YOU!!! 

Three truly fab winners!! 

Don't forget to enter our Christmas Blog Candy No.3, 'What does Christmas mean to you?'

We'd love to hear your thoughts so do join in the next giveaway!

Sunday, 6 December 2009

Tuesday Taggers Blog Hop here today & tomorrow!


Good morning and welcome to all the Tuesday Tagger blog hoppers!

I mentioned in yesterday's post about the prizes we are sponsoring, so scroll down if you missed that info yesterday.  Basically Tracey, Debbie and I are each sponsoring one of Tracey's recent unmounted stamp sheets each.  My sheet is the Classical Instruments from which the above card has been made.  I'll give more details about it after the blog hop info.


If you would like to join in the Blog Hop, then you will need to go to the Tuesday Taggers Blog which is your starting point.  You will find the instructions there.

For those that have already started, well done on getting this far.   I'm going to hop along too just for the fun of it and I'm sure I will be tagging along at the end as I'm sure to get sidetracked reading everyone's blogs along the way!

Just to check you are hopping in the right direction, you should have arrived here from Avril's Blog, if you have missed any of the hops you may want to go back to the beginning and check through from the Tuesday Taggers blog which is the starting point.

The letter you need from me is an O!  Don't forget to leave a comment for a chance to win a prize!

Your next visit should now be to Janet's Blog.

Thank you for joining in and I hope you have enjoyed your journey so far!

*  *  *  *  *  *
OK, back to the card...

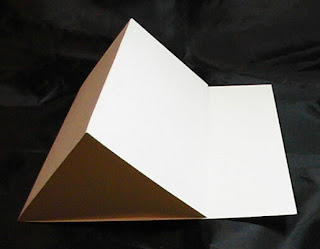
The next couple of pictures shown the fold for the easel card, it is so simple to do.  You can use any shape or size card, I've used a 4" square card (that was already folded in half).  Now fold the front of the card in half so that the mountain fold is at the front.


This is how the fold should be made. 


You will need to cut a separate piece of card that is the same size as the folded card, I used a 4" square piece cut from a sheet of Starburst Stain/cling film technique.


Here's the same technique but in a different colour.  Both are from the French Country set.  Amaryllis Burgundy and Jack in the Pulpit Teal.


You can decorate as much of the card as you like, I did the back top panel and half of the bottom base with the same stain card but left the inside triangle part blank. 

I embossed the trumpet and all the wording with gold embossing powder.  I then layered them onto gold mirri card. 

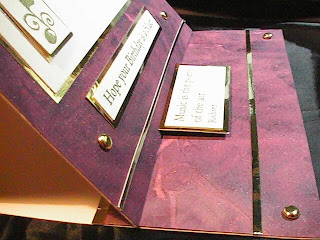
I added double-sided tape to the back of mirri card then cut thin strips for borders (they aren't peel offs), so it would all match, I also added gold brads.  Here is a side view of the finished card.


I used wording on the bottom piece, lifted with foam pads, to hold the front panel in place.


To close the card to put in an envelope, lift the front panel and it will lay down to form the original 4" square card.

Thanks for visiting,

Jill