Showing posts with label Moonshadow Ink Techniques. Show all posts

Sunday, 20 May 2012

Workshop yesterday in Snod Hall


Ian and I had a fab day yesterday at a workshop organised by Cazro who many of you know in blogland. 
 

The workshop was to decorate a Vintage Photo Frame.  The original frame I used as the basis of the workshop was no longer available (the frame at the top right of the page) so the design was changed but still made in the same style.  I haven't taken a picture of my frame yet but will show it another time.  I have more photos to show from the day but here is a start.

The hall is a fabulous place to hold a workshop, there was plenty of room to work in and natural light.


The 15 ladies learnt the general techniques and then applied them to their frames in their own way, it was lovely to see so many variations, each one different to the next.  This was the first time the ladies had tried this and some felt out of their comfort zone but they all should feel proud of their work.  

Some feature vintage photos, others are made back into mirrors.  This selection is from my camera, I also have some on my phone to show.  

Unfortunately the photos really don't do the frames justice, the true colours and shimmery effects just don't seem to photograph well on my camera but they will give an idea of what we were doing.

Adding an old photo really brings the frames to life


We used Moonshadow Inks on the frames along with the Fran-tage Encrusted Jewel Technique.


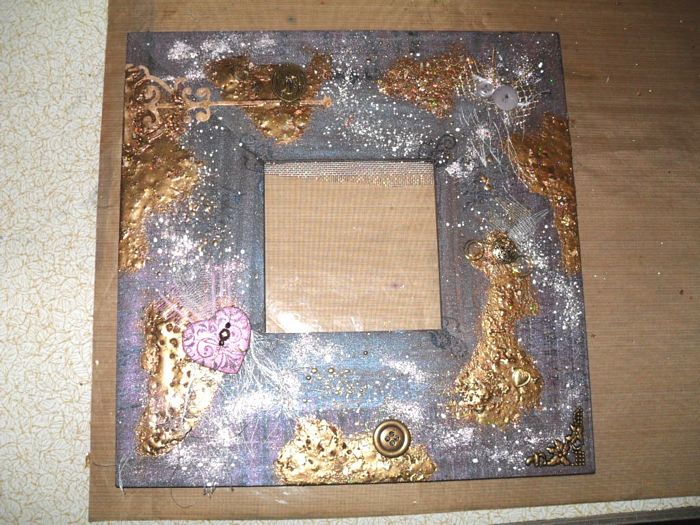
We initially used a magic mix I made up that contained embossing powders and lots of bling to create random  textures.


This frame was made for a grand daughter one of the ladies, they make great gifts.


I'll show more another time.

I'd like to thank Carol for organising the day and for all the ladies who came and made it a very special day.

We've been asked back to hold another workshop later in the year and we will definitely look forward to it!

Jill x


Friday, 22 October 2010

Stamp Magic Show, The Dome, Doncaster


Are you planning to come to the show on Sunday?  If so, you'll see these and others I have made this week in real life!

I will be demonstrating the technique Vix showed at the Port Sunlight show and also our demo weekend last week.  It is transfering images/printed papers onto sticky back canvas.  I'll also be showing how to make embossed embellishments with Moonglow 2-tone embossing powders.  They really are magic!!!

I've also made another batch of Moonglow embossing powder sample pieces, ATC size, to give away, so that you can remember it when you get home.

The image below was transfered onto canvas from a lazer printed image.  It has a distressed aged feel to it so of course it had to have my favourite Moonshadow inks as the background for the card! 


I've used  Incandescent Copper with the cling film technique.The heart embellishment is embossed with Moonglow Holly Red Gold Embossing Powder, I've stamped into it with my favourite stamp at the moment, Hero Arts S5449 Fabulous Flourish.  It's such a versatile stamp!!

I'll be showing how it's done at the show so do pop along for a demo.  If you haven't got a ticket, no worries, just pop along on Sunday and pay on the door. Show open: 10am - 4pm, tickets: £5


The next card is made with the  Tim Holtz Sizzix Bigz Die - Bigz Fanciful Flight


Again I've embossed it with the 2-tone Moonglow embossing powders. This time my background is made with Starburst Stains and the scrunch technique but has an added extra, black webbing spray.  What's that I hear you think!!

We'll I first used it well over 10 years ago and like everything crafty, you end up moving onto new things and forget your old favourites, well I rediscovered this as I was looking for something to add a finishing touch to a picture frame I decorated recently, and lo and behold I looked at the mirror I painted and spray at least 10 years ago that still hangs in our living room and voila, I dug out my cans!!  It's available in gold. silver, black and white.

If you think silly spray, you're thinking along the right lines except this is finer and more hard wearing.  I've been wiping my frame at home with a damp cloth for years and it's still as good as it was when I first sprayed it.  It comes out a little like silly spray, it's quite strange!  If you spray it onto your cards/papers in a plastic bowl/tray you will get a built up of the surplus that can be peeled off and punched. Another tip, it is whiffy, like a spray paint so do your spraying outside if you can.

As it's an aerosol spray, it cannot be posted for mail order, so if you see it anywhere and think you want it, then grab it while you can, don't umm and arr, it'll be too late when you get home!!! 

We'll have some at the show.  It's not a cheap product but it lasts and is so effective.

Here's a close up that show's the Moonglow Lapis Lazuli blue/gold embossing powder and the webbing spray background


If you can't make it to the show, then we have the EP's on the website on Special Offer at the moment and if you are at the show, we have a Show Special with them too!

I'll be back on Sunday with another card showing these techniques.

Have a great weekend!!

Jill

Tuesday, 8 December 2009

Butterfly Beauties and Moonshadow Ink


Good morning!

Well, the blog hop has ended now, I believe the Tuesday Tagger's will be announcing the winners of the prizes tomorrow, so pop over tomorrow to see if you have won!

Today's card is another from the show on 28th November, with the same Butterfly Beauties sheet, Moonshadow inks, and course salt.

We had acetate on the show along with Timber Brown Stazon which worked well with the butterfly image.


I added some nailhead embellishments on the acetate and wording strip to add a little bling.


I cut the wording panel and threaded through a Moonglow card strip as a change from using ribbon.


You can see the little flowers made with the salt and ink.

Just to answer a couple of the comments from yesterday's post...

Wilma, you mentioned that you missed the show, well I have been asked back for another show on Saturday 16th January, 11am, they have asked me to do a techniques show and they will also have the DVD I made.  It covers the 8 products in the Moonglow range but mainly features techniques with Moonshadow Inks.

McKinkle, I usually do my messy stuff in the kitchen, spread lots of paper out and it shouldn't be too messy, although I have to admit to hitting the toaster and kettle before now with the Moonshadow Mists when I've got carried away!  But it all cleans off.  If you have a non-stick craft sheet you'll find it a lot easier to keep the area clean.

Jill

Monday, 7 December 2009

Blog hopping and other stuff


Thank you to everyone who hopped by yesterday to take part in the Tuesday Tagger's Blog Hop.  If you didn't join in yesterday, you still can, as it runs through today too, and you still have a great chance of winning some nice prizes!  Scroll down or click on yesterday's post to get all the details about it, where to start etc.  It was a great fun yesterday, so well worth you joining in with it today.  Thank you to all the Tuesday Tagger admin team for organising it, count us in if you want to do it again:)

Today's card is another from last Saturday's Create and Craft TV show.  A whopper, 8" x 8" card. 

It's featuring my all time yummy favourite Moonshadow Inks!  The colours are great and the fact that the mica and walnut ink separate so well never fails to wow me.  I just love them so much.  I used Craft Creations linen white card for this, the Moonshadow Inks LOVE their textured cards!  Their card is great quality, a fab weight and thickness to it, which makes a better quality card.  When you think of the time you spend making a card, spending a little more on good quality card is SO sensible, it really makes a difference. 


Craft Creations also provide a service to cut card to size for you.  I've been using their service for this for well over 20 years now, even before Ian and I got together and started The Stamp Man.   

Sorry, digressing...  

When I received my first jars of Moonshadow Ink to try, I was very nervous about using them, I hadn't a clue what to do with them apart from the instructions about adding hot water to the fill line!  I spoke to Lindy who developed them and she suggested I give a piece of card a wash of the ink and then add some salt....  Ummm....


Well, I gave it a try and have been totally hooked ever since!

On last Saturday's show, Nigel waggled the card around so you could see the difference when you move the card, he really showed the brown look from the walnut ink and the stunning green shimmer from the mica.  Good lad!! 

When you add salt to the inks, well, special stuff happens, the salt draws up the ink, as in silk painting, leaving lovely flower like patterns as in this example of rock/course salt


Here's the same idea with Buccaner Bay Blue, oh, so, fab, wish you could really see this one!


And, aged pitted vintage style patterns with normal table salt.


OH, ....Love it, love it, love it!  Lots of yummy mica in these jars!!

I also painted the bling maiden's hair with the same Moonshadow Inks. 


You cannot see in this photo but her hair really shimmers too!


Oh, I had to share this piece too, Violaceous Violet Moonshadow Ink with the cling film technique same idea as yesterday's post, but with Moonshadow Inks!

All yummy, yum, yum, yumminess!!

I started making my Christmas cards yesterday, 'twas quite a frenzy!  Lots of elements made for them so far, but no actual finished cards just yet, although 4 almost sort of done:)  I had better get a move on with them...

Thanks for stopping by, and for leaving all your comments. 

Jill

Tuesday, 22 September 2009

Sepia travel themed mini suitcase for Tuesday Taggers


The Stamp Man is sponsoring the Tuesday Taggers Challenge this week and I couldn't pass the chance of joining in with this theme, it had my name on it!! SEPIA!


It gave me a good excuse to get my suitcase out... no I'm not going anywhere... it's one of those mini ones I posted about previously.

Apart from decorating the suitcase with lots of travel stickers, I made a double-sided mini concertina book to go inside. There are 11 panels each side, 22 atc(ish) sized pages. I left a blank page on each side for notes or a greeting. I had intended it to have 10 panels but thought it would be nice to have somewhere to write in it too. I have just shown a selection of the pages here, I don't want you nodding off half way through the photos!! I will post more photo's in a separate post that will be at the end of this one so I don't bore you with too much detail here. I also have one of the pink cases that I will do a similiar idea with another time, but with a different theme. I have really enjoyed this project....

The main colouring is from using various pieces of card/paper I have made with Moonshadow inks. I used rubber stamps, stickers, rub-ons, mini postcards, printed word papers, brass charms, and even managed to fit in a bit of Cuttlebugging too.


I made the actual base concertina from the paper we have in our concertina card packs which starts as a metre long piece. I didn't want to leave it white so I used Ranger's Tea Dye Distress ink for a sepia look. I made all the separate panels then laid them all out on the paper before deciding the order I wanted to place them, so that similiar panels were not next to each other.


I made some tags to adorn the handle that are attached with gold jump rings, one is a suitcase brass charm, another is a tiny tag decorated with a cigar label and a TH discover word bubble. The 3 metal dog tags have a separate word on each, saying 'pick a place'. As these were silver metal and I wanted gold/copper, I used alcohol inks on them which toned them down alot.

If you'd like to join in the challenge too, I know you will be most welcome, so visit the Tuesday Taggers blog for the info.

Jill

More sepia/travel themed suitcase photos


I bought these suitcases for the shop a while ago, I thought they would be good for presents where you could make something to go inside, my thoughts were a mini concertina book, jewellery you have made or even as they are for use as travel jewellery cases.

Some of the inside panels.


The suitcases had sat in a box under a table in the shop for a while then blow me, T!m Holtz blogged about a class he took where they made mini books to go inside. It inspire me to get them out to at least show we had them in stock.


I was delighted when Janet told me about the sepia challenge for the Tuesday Taggers, it got me all fired up to actually get on with it.
Thanks for looking!

Jill

Saturday, 20 June 2009

The 'Scrunch' with Moonshadow Inks

Following on from yesterday's scrunch card, here is the same idea with a different image, again from Joanna Sheen's Fashion Boutique CD. I love this image and I think it works well with the Moonshadow Inks. I have embossed the scrunch with gold embossing powder too which lifts the peaks of the paper and stand out from the burnt umber Moonshadow Ink

The best way to attach the scrunch to the front of the whole card is to put double-sided tape around all the edges of the card, right along the edges. Place the scrunch piece face down on the table, remove all the backing tape from the card then place the card onto the paper, then trim to fit. If you try to cut the scrunch to the size of the card you will find that because of the texture of the paper it will keep moving, you'll be trimming it forever, and never get it straight!

Once you have a pile of ready made backgrounds to hand, this card is actually very quick and easy to make.

More tomorrow!

Jill

Friday, 19 June 2009

Last of the Father's Day cards

Today Debbie helped me get the rest of those unmounted stamps I talked about yesterday bagged and ready for the Stamp Magic show on Sunday. We kept reading the funny ones out and a couple of ladies who called in bought some too, there are some great ones that I now wish I'd ordered more of. There was only 2 of one of the good ones and Debbie and one of the customers bought them, so none for me:(

Debbie, Helen, Ian and I have almost finished packing for the show now. We have a whole display board of cards with Kay's new stamp designs and they do look good. Nearly finished packing the demo stuff too so almost set.

Well, here's the last of the series of Father's Day card ideas for this year. For this one I used Moonshadow Inks with the scrunch technique to create the background and used an image from Joanna Sheen's Fashion Boutique which has been decoupaged. I misted the base card with the inks to tone down the whiteness. After I made the scrunch background, I misted it as well so that it really has extra shimmer to match the gents silk smoking jacket.

Hope you all have a lovely weekend, looking forward to seeing everyone that can make it to the Stamp Magic show on Sunday.

Jill

Friday, 29 May 2009

Moonshadow Ink and salt

Hasn't it been a lovely day! So hot and sunny here in Skipton, but... our unit is so cold that I usually wear a thermal vest, I still did today believe it or not so nothing changed there, but for the first time we didn't have to put the heating on!

A chap called in yesterday with a leaflet for air conditioning, I don't think he'll be getting an order from us anytime soon:) So escape the heat and come visit us, lol!

Today's card is made with Aspects of Design 25 Rambling 1 sheet. Ideal to use for cards for people who like walking and the countryside. The designs were drawn by a local pen and ink artist, and feature Yorkshire and Cumbrian scenes, do you recognise any of the places? It is one of the cards that featured in our Create and Craft TV show Countrylife, the products featured on the show can be found here. All the stamp sheets have appropriate wording that can be used with the images.

The image was stamped with black stazon ink and then water coloured with Tombow brush pens. The rambler and sheep were embossed with detail copper embossing powder cut out and layered onto the image with silicone glue to give a 3D effect.

The wording has been embossed onto torn heatable acetate that has been attached to the back of the card (at the sides) before it was mounted onto the green mount.

The background is made with copper, gold and green Moonshadow inks. I applied a wash over the card then added random blobs of the inks all over. I then sprinkled rock salt and table salt onto the wet ink. I left it to dry completely before taking into the garden to brush the salt away.

The result is a very textured finish as the salt has soaked up some of the inks to form patterns. Use rock salt for distinctive patterns/textures, and table salt for an aged pitted look, or, just use both!

I hope you will try it sometime, it's great fun!!!

Jill x

Wednesday, 27 May 2009

More for Father's Day

Busy day today, lots of mail order to send out, ordering to replenish shelves, and customers visiting. It will be a completely different day tomorrow as we have a Starburst Stain workshop, so time to play!

Another couple of cards here using the Moonshadow Inks. Again both could be Father's Day cards.

The first card shows the blob technique as the border that is a piece of white textured card that looks like leather. The base 6" square base card has been sprayed with Moonshadow Mist. I used postcards from an embellishment pack, one is mounted onto gold and copper mirri card with brads attached. I placed the reverse side of 2 postcards onto the base card, added the peel off border and detail painted the anchor before mounting the main image on top.

The second is a variation of a card I posted a few days ago, made the same way but with a different layout.

Thanks for sticking with me with this Father's Day theme! Only a couple more in the pipeline now:)

Jill x

Tuesday, 26 May 2009

Moonshadow Ink Nautical Father's Day Card


This is an 8" x 8" card that incorporates some of the techniques with the inks that I've mentioned before (please click on the photo for a closer look).

I misted the base card with copper and green Moonshadow Mists and added the scrunch technique using various colours as a border, and added a strip of copper mirri card over the join.

The centre mount has been given a wash of gold onto hammered card, then I dabbed the wet ink with kitchen towel to lift some of the colour away to leave paler shades. This pieces was then mounted onto copper mirri card attached with copper brads.

I stamped the script stamp with brown Stazon and tore the edges. A wash was added but with copper ink then again dabbed with kitchen towel. I then painted the edges with ink.

The main images were embossed with Moonglow 2 tone embossing powders (obsidian colours of sapphire, copper, and emerald). They were detail painted with the inks then mounted onto copper mirri card and attached with brads. The galleon is attached with silicone glue.

The wording was made the same way as the background mounts, the brads are for decorative purposes as the piece was glued into place with silicone glue.

The final touch is the driftwood/rope which I mentioned in an earlier post, (thanks Hamish!)

Jill x

Thursday, 21 May 2009

Mens Concertina Card/Book


I spent most of yesterday afternoon folding the papers we put in our concertina book packs. The square one isn't too bad as it is a 4 panel book, but the 6" x 4" book has 8 panels and starts with a metre long piece of paper, I folded so many... and afterwards my hands hurt, and were very shiny!

They are worth the effort though as they make super projects/gifts. If you'd like to see what we have made with them you can see more in our Gallery, click here to be taken to the main page, you will need to find the albums for Concertina Cards. If you haven't visited a picturetrail gallery before, just to help (as we have been asked before) click on the picture of the album cover you want and it will open to show more photos. I should add that it is the blank books only so you can decorate them as you want to, not particularly as we have. They are great to personalise for people with photos and relevant themes.

I never really know whether I should call them cards or books, as they are a bit too substantial to be cards, they certainly look lovely on a mantlepiece and I defy anyone to feel disappointed on receiving one as a gift. They come with instructions on how to put them together and tips to help you make them.

The book I'm showing here is one I made with Moonshadow inks and our AOD Mens unmounted stamp sheet, that would be ideal for a Fathers Day card/gift (to continue my running theme) but there are lots more ideas for them in the gallery.

I've made pockets on some of the panels that they could keep business cards in or little notes, for this one I made ATCs, you could do the same and write greetings or messages on them, or perhaps put in some small family photos in the pockets.

I cut off 2 of the panels for this one to make a 6 panel book or you could make it a four panel if time is short.

The front and back covers are made with copier paper and Moonshadow ink (the Scrunch technique), after it dried I went loopy over the surface with different ink pads (just lightly drawn across the high peaks), I sprayed it with water, scrunch it again and even embossed it. It now feels like fabric, lovely to touch, you'd never believe it was cheap copier paper!

If you fancy giving them a try, they are available here in our shop.

Jill x

The 6 panels of the Mens Concertina Card/Book