Showing posts with label Vintage. Show all posts

Tuesday, 19 June 2012

Stampendous Railway Clear Stamp Set - a few more cards!


Here are a few more cards made with the Stampendous Railway clear Stamp Set SSC1139 that I featured here on Sunday with some other ideas/layouts.

I have used the Stampendous CRN247 Locomotive cling stamp for the main panel.

Again I used a coffee background and a Quickie Glue Pen to edge the mount for the main panel along with Stampendous Aged Gold Embossing Enamel.  I coloured the main panel with chalks.


The railway map makes a great border.  I have trimmed off the border lines and torn one of the edges on the card below. 


Finally, a smaller version of the steam train card.  I added some gold halo glitter into the mix to give it a bit more sparkle.


I really think this is a great set for mens cards, especially those that are older who perhaps don't appreciate the usual sports or drink themed cards.  Using them for scrapbooking would be good too!

I'll be taking my cards to the Ross Papercraft show, Rainton Meadows, Houghton-le-Spring, near Sunderland on Sunday if you'd like to see the cards I made for the show and I'll be demonstrating the encrusted jewel technique there.

You'll find more details about the show HERE, we'll look forward to seeing you if you are local and able to attend :)

Thank you for visiting!

Jill x

Monday, 18 June 2012

Fantasy Tile card from Ideal World/Stampendous show


I used Stampendous SSC1137-R Fantasy Tiles Perfectly Clear Stamps for this tag card.

The images are all 1" square, (called inchies). They are versatile as they can be used in multiples and are great for ATCs.


I sprayed the tag with coffee and coloured with chalks when dry.

I stamped the images with Versafine black ink then embossed them with Stampendous detail clear embossing powder.  The image below is a 1" version of the 2" main stamp that is also available.


I used a Quickie Glue Pen to apply a fine scribble around the edge of the card then added Stampendous Aged Black Embossing Enamel and heated straight away.

The enamel seems to expand and I love the way it works with the fine glue pen rather than any other embossing pen as they can make it look too thick.  I love the randomness of the blobs of heated powder.

You can see the colours in the powder in the photo above, the gold flecks give a lovely finish.


The stamp sheet also includes this lovely filigree border, very useful!!!

I'll show more cards with the stamps I was asked to demo in the show another time!

Thanks for visiting

Jill x

Sunday, 17 June 2012

Cards from Stampendous/IW show on Wednesday


Did you manage to watch the show?  It was really busy on Wednesday with craft shows on both Ideal World and Create and Craft at the same time, in fact I have never been there when it has been SO busy.  I do marvel at how they do so many shows back to back like that!!  It was also great to catch up with the guests that were around that day too.

I didn't get to show everything in the show - what's new - so I'll show the cards and other info here.

As it is Father's Day today I thought I would start with this card featuring the Stampendous Perfectly Clear stamp set Railway (SSC1139)


I'll be adding this card to our Time/Travel themed challenge as it is appropriate for that.  This challenge started on Friday so there is still time for you to join in too.


I have been asked about the square stud brads I used, they are from Woodware and are available in brass, copper, silver and pewter.  There are 3 sizes in the packs, 36 brads in total.  I used the largest (above) and the smallest (below).  They are great for vintage cards and altered projects.


For the Frantage steam effect for the train I mainly used shabby white, aged ivory, aged aqua embossing enamels with a few bits of aged black and silver that I sprinkled in with my fingers, just tiny pinches.  I also added some glitter glass.


I sprayed coffee for the background and added colour with chalks.  I am really enjoying using chalks again they add such soft and subtle colour and blend really well even on the coffee background.  The spray bottles I used are HERE.

The Father greeting I added is from Woodware Stamps - Clear Magic - FRCL079 - Male Relatives

I hope you are all enjoying your Sunday

Thanks for visiting!

Jill x

Saturday, 26 May 2012

Encrusted Jewel Technique Vintage Photo Frame


I finally got round to taking a photo of the frame I made for the workshop last weekend.  I made another frame using the Ikea mirror that the ladies were going to decorate as the smaller frame is no longer available (typical!) but it did give us a bigger area to work with.


It is the type of project where no 2 frames would be exactly the same so I wanted to decorate the new frame  to give the ladies something visual to look at while at the same time, adapting the techniques for their own frames.


It is really hard to capture the colours of the Moonshadow Ink and the gold embossing so I took these photos outside in the sunshine today which has helped a bit.


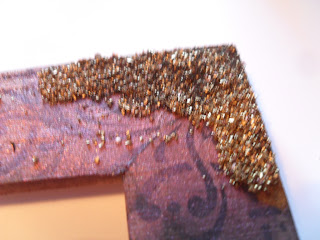
The frame is stained with Moonshadow Ink and stamped with Stampendous Elegant Border stamps.


I made up a magical mix of embossing powders, fragments, glitters etc, then added aged gold and shabby white embossing enamels randomly.


Ribbon was embedding in the embossing here and there too and also stained with Moonshadow Ink before fraying and adding to the centre


One of the reasons I'm only just getting round to posting this is that I was floored by a really nasty bug this week, thankfully it is gone now, it's far too hot to have a bug!

I hope you are having a great weekend and enjoying this lovely weather, keep cool :)

Jill x

Sunday, 20 May 2012

Workshop yesterday in Snod Hall


Ian and I had a fab day yesterday at a workshop organised by Cazro who many of you know in blogland. 
 

The workshop was to decorate a Vintage Photo Frame.  The original frame I used as the basis of the workshop was no longer available (the frame at the top right of the page) so the design was changed but still made in the same style.  I haven't taken a picture of my frame yet but will show it another time.  I have more photos to show from the day but here is a start.

The hall is a fabulous place to hold a workshop, there was plenty of room to work in and natural light.


The 15 ladies learnt the general techniques and then applied them to their frames in their own way, it was lovely to see so many variations, each one different to the next.  This was the first time the ladies had tried this and some felt out of their comfort zone but they all should feel proud of their work.  

Some feature vintage photos, others are made back into mirrors.  This selection is from my camera, I also have some on my phone to show.  

Unfortunately the photos really don't do the frames justice, the true colours and shimmery effects just don't seem to photograph well on my camera but they will give an idea of what we were doing.

Adding an old photo really brings the frames to life


We used Moonshadow Inks on the frames along with the Fran-tage Encrusted Jewel Technique.


We initially used a magic mix I made up that contained embossing powders and lots of bling to create random  textures.


This frame was made for a grand daughter one of the ladies, they make great gifts.


I'll show more another time.

I'd like to thank Carol for organising the day and for all the ladies who came and made it a very special day.

We've been asked back to hold another workshop later in the year and we will definitely look forward to it!

Jill x


Friday, 9 March 2012

New Challenge - Vintage Theme - Part one!


Our new fortnightly challenge starts today over on our Challenge blog HERE.  The team have made fantastic projects again, and I've certainly enjoyed playing making this embossed frame.

I bought 3 frames for £1, so a great bargain, and the photo was 50p (a local original from October 1928).  I just loved playing with the Stampendous Fran-tage products last September at the Woodware retailer day, I can see me having much more fun with them in future!

The great thing about new things is they can combine your old crafty bits and pieces and I used my old faithful Moonshadow inks to paint the wooden frame

The things I used are:

Moonshadow ink
Stampendous CRS5031-R Cling Jumbo Hollyhock
Stampendous Fran-tage mica and embossing powder mixes


The Moonshadow inks all appear brown when first applied
due to their walnut ink base.  The colour will show when they dry, as will the gorgeous shimmery finish.  Add one or more colours, they blend really well, even on wood.


Once dry I stamped with the border stamp in the hollyhock stamp set.  I then added more of the ink to one of the corners before adding the Stampendous Fran-tage embossing powders.  The ink held the powders in place like an embossing ink normally would on card. Using the ink made it more random than applying the ink from an ink pad.

I added some of the Shabby Chic colours to the metallics.  You need to hold your heat gun far away until the powder starts to melt otherwise it flies everywhere.  If you have a heat gun with a low setting or one of the hair dryer type guns then they are the best to use.

When using Fran's Fran-tage technique on card you would normally hold the heat gun underneath so that the powder doesn't fly about.  This is a slight variation, but still using Fran's encrusted jewel technique.


While the powder was hot I added some mesh ribbon then sprinkled and heated more powder on top to make sure it was embedded.  Test and make sure that your mesh is heat resistant before you add it!


I had some left over pieces of metal that are ideal for embedding into the molten embossing powder to add more texture.  Keep building up the powder for extra texture


Well, as blogger won't let me add more photos to this post I will continue with it another time, probably when I get back from our show this weekend at the Nissan Sport and Social Club in Sunderland.  There's packing and lots to do today to prep for it.  The show is open on Sunday from 10am - 3pm.  Show details are available here:  http://www.rosspapercraftshows.co.uk/

If you are able to attend the show do visit our stand as I will have this frame and other new things to show that I am working on plus other products that I will be demonstrating.  We will have some lovely new stamps and things with us plus lots of bargains for you too!

If that's not local, we'll be at the Harrogate show next weekend, maybe we will see you there.

Thanks for visiting, have a great weekend :)

Jill x

Thursday, 2 February 2012

Stampendous 2012 Catalogue!! WOW!!!!


The stamps and accessories are now on our website HERE

There are some great designs on various themes, here's a little selection...I LOVE the Butterfly Post!!!!


Then there's the beautiful botanicals....


Steampunk....


Creative steampunk...


Alice


And then there's cute...


and nostalgic romance...

I reckon there is something for everyone's taste stamp-wise

Now take a look at these beauties!!!

Fragments...


Enamels...


Glitters and Glass


Tinsels
 and Mica mixes!!!

Yum, yum, yum!!!

Sorry I got a bit carried away adding pictures... but there are lots more great stamp designs if you want to have a peek at the rest of them HERE.  Our sale is still on so it is a great time to treat yourself!!

Thanks for visiting

Jill x