Good morning and welcome to all the Tuesday Tagger blog hoppers!
I mentioned in yesterday's post about the prizes we are sponsoring, so scroll down if you missed that info yesterday. Basically Tracey, Debbie and I are each sponsoring one of Tracey's recent unmounted stamp sheets each. My sheet is the Classical Instruments from which the above card has been made. I'll give more details about it after the blog hop info.
For those that have already started, well done on getting this far. I'm going to hop along too just for the fun of it and I'm sure I will be tagging along at the end as I'm sure to get sidetracked reading everyone's blogs along the way!
Just to check you are hopping in the right direction, you should have arrived here from Avril's Blog, if you have missed any of the hops you may want to go back to the beginning and check through from the Tuesday Taggers blog which is the starting point.
The letter you need from me is an O! Don't forget to leave a comment for a chance to win a prize!
Your next visit should now be to Janet's Blog.
Thank you for joining in and I hope you have enjoyed your journey so far!
* * * * * *
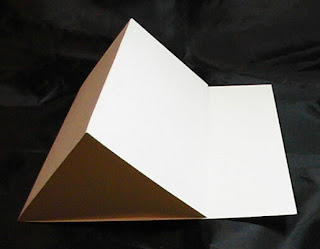
OK, back to the card...The next couple of pictures shown the fold for the easel card, it is so simple to do. You can use any shape or size card, I've used a 4" square card (that was already folded in half). Now fold the front of the card in half so that the mountain fold is at the front.
This is how the fold should be made.
You will need to cut a separate piece of card that is the same size as the folded card, I used a 4" square piece cut from a sheet of Starburst Stain/cling film technique.
Here's the same technique but in a different colour. Both are from the French Country set. Amaryllis Burgundy and Jack in the Pulpit Teal.
You can decorate as much of the card as you like, I did the back top panel and half of the bottom base with the same stain card but left the inside triangle part blank.
I embossed the trumpet and all the wording with gold embossing powder. I then layered them onto gold mirri card.
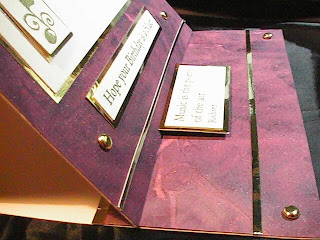
I added double-sided tape to the back of mirri card then cut thin strips for borders (they aren't peel offs), so it would all match, I also added gold brads. Here is a side view of the finished card.
I used wording on the bottom piece, lifted with foam pads, to hold the front panel in place.
To close the card to put in an envelope, lift the front panel and it will lay down to form the original 4" square card.
Thanks for visiting,
Jill


Good morning Jill, this blog hop is fun, thoroughly enjoying visiting all the blogs.
ReplyDeleteYour easel card is gorgeous and thanks for full instructions on how to make one.
Off to check the next blog.
Love & Hugs
Christine xx
oooh, Jill! That is stunning! I thoroughly enjoyed watching you last weekend! You were fab! Off to the next blog - this hop is fun!
ReplyDeleteunusual stamps and I bet they are really versatile thanks for the chance to win Julye
ReplyDeleteHi Jill, Gorgeous card! Thanks for the instructions. Think I might have a go at making one of these.
ReplyDeleteLisa x
our card is gorgeous hugs nikki xxx
ReplyDeleteOff to blog hop properly after starting here! I really must have a go at an easel card, I really like them! Love the starburst stain paper, of course 'Jack in the pulpit' is my favourite colour :)
ReplyDeleteHi Jill,
ReplyDeletethanks for the tutorial for your fabulous card. Love it.
Hugs,
Fiona x
This is fun, although its going to be a slow process once you discover all these new blogs, thanks for the offer of such georgeous stamps. Nicola x
ReplyDeleteHi Jill, this is amazing and i love the scrolling effect on the stamps,classical, luv Georginaxx
ReplyDeletePretty and so sophisticated too. Thanks for sharing it.
ReplyDeleteBeautiful card, thanks for the great instructions. Wonderful prizes hope to se you at the shop before Christmas. Bee
ReplyDeleteWhat an absolutely fabulous card! And thanks for the instructions too.
ReplyDeletesuperb card Jill - thecolours are amazing -love the easel cards - they are very 'in' at the moment -the images are stunning on the sheet x
ReplyDeleteI just needed instructions for an easel card, so I'm very pleased to see them
ReplyDeleteThanks for sharing....beautiful image and card.
ReplyDeletexoxo
Elegant looking card!
ReplyDeleteWhat a stunning easel card Jill. Perfect colors and I so want the instruments stamps!
ReplyDeleteHave a blessed day!
Mary
Totally stunning card
ReplyDeleteHugs
Suzanne x
Evening Jill. Well I've hopped this far so must be doing something right. It's great fun. Your card is beautiful. Those sheets of SS look fantastic. I have that set but never used the colours just on their own. I must try them, they are so rich and beautiful.
ReplyDeleteCaught the re run of Japenese Garden on C&C this afternoon. Must be one of my favourites, I thoroughly enjoyed seeing it again.
Hope you've had a good weekend.
Lisax
I have a few musical friends who would love that card ,brill....x
ReplyDeleteIt's just dropped who's blog I'm on lol I love your work Jill. Once I was watching Creat&Craft and e-maild in and I was lucky enough to get the samples you made. I love the colours you used on this card and the stamps are stunning
ReplyDeleteoxo
Ildiko
Oh i am so very greatful for that tutorial , I have been wanting to know how to make one of those fancy easel cards thank you. Your card is beautiful totally proffesional and very classic! on tothe next blog... *Candace*
ReplyDeleteLove those images - they would be great to win. Your instructions are so helpful, I did not realise it was that easy to make an easel card. I will have a go this week
ReplyDeleteLOVE YOUR BLOG AND YOUR CARD!!
ReplyDeleteOh my gosh your card is just beautiful.
ReplyDeleteLove your card
ReplyDeleteLuv Jane xxx
Jill this is a beautiful card, and I wish I could enter to be in with a chance to win these fantastic stamps, but alas, that would not be fair....LOL. but I think I will be asking Santa for some....LOL. thank you so much for joining us in the hop, I hope you enjoyed it too, it would not have happened if you Debbie and Tracey had not taken part...so thanks from the bottom of my heart...Hugs Avril xxxx
ReplyDeleteVery nice card. Great instructions as well - thanks!
ReplyDeleteomgosh, this is gorgeous!!!!
ReplyDeleteBlessings, Maria